diy party decorations using paper
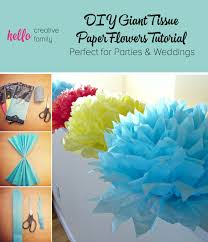
Tissue paper flowers are so easy and inexpensive to make and add a huge impact to a room. Today I thought I would share my tutorial for DIY Giant Tissue Paper Flowers. You can make 2 of them in 5-10 minutes and they cost 50 cents each! This is the perfect craft for people who say “Oh I’d love to make that… but I’m not crafty.” You are crafty enough to make these. I shared pictures yesterday in Turtle’s 1st Birthday Party post so today I thought I would share how to make them. Step 1: Count out 10 sheets of tissue paper and lay them out stacked on top of each other on a flat surface. The shorter side of the tissue paper should be facing you as pictured. Step 2: Accordion fold your tissue paper making each fold approximately 1 inch wide. Fold all the way to the end of the tissue paper. (The above picture is the halfway point… keep folding until you reach the end of the paper.) Step 3: Tie the string around your tissue paper at the halfway point of the paper.
(Most tissue paper will have a crease, if not just eyeball it or if you want to be more exact fold your tissue paper in half to see where your string should go.) Double knot your string. Step 4: Cut your petal shape out of each end of the tissue paper. (I have the same rounded shape cut out of the opposite end of the tissue paper that disappears off of this photo.) You can cut different shapes depending on what kind of flower you want to make. A rounded petal looks like a peony or rose. Round with slits looks like a chrysanthemum. A triangle looks like a dahlia. Rust & Sunshine has a great tutorial with different cuts for different types of flowers. I HIGHLY recommend checking out her site. She also layers different colors of tissue paper and the result is beautiful. Step 5: One sheet at a time start gently separating and fluffing your flower. Work gingerly so as not to tear the tissue paper. Work back and forth from one side to the next. And quickly a flower will start to emerge!
Now decorate with them. Hang them around the room, use as a centerpiece, make a focal wall, or line them up along a pony-wall and around the birthday cake like we did at Turtle’s Birthday party. We made these flowers for my sister’s wedding, and the result was beautiful! Check out the arch.I love hearing from you! Want to learn how to make Mini Tissue Paper Flowers? Check out this post here:
exterior steel door paint DIY Mini Tissue Paper Flowers
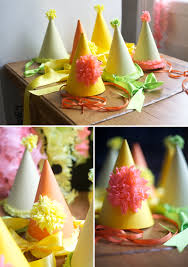
baby room decor-name lettersI love making party hats.
exterior steel door paintI usually make my own because it is surprisingly hard to find party hats in normal colors.
marshalls home decor online shopping
If I do happen to find them in the colors I like then I still spruce them up with my own fringe or flowers. Sometimes though I do prefer them plain like this one I put on Roman. I did a post on this a few years ago (here + here) but it is high time for an update. Downloadable Hat Template Click here to download. Heavy Paper (like poster board or cardstock) Crepe Paper (or you can also use tissue paper for the big flowers)
home decor accents cheap Basic Party Hat Instructions
the best christmas decorations 2013 Step 1: Download hat pdf right here. Print, then cut out the template. Take the hat template and trace it onto the heavy paper. Step 2: Cut out the traced party hat. Step 3: Put the tab into the slot. Step 4: On each side of the hat make criss crossed cuts with your x-acto knife.

Step 5: Push the ribbon through each hole (I use my x-acto to do this) and tie a knot to hold it. That is how to make a basic hat. For more of the details see below. Once you have your hat then it’s time for the fun part: Embellishment! The fringe and ball are very easy to make, it is basically a version of the streamers (more detailed instructions over here. Here is how to do it.Cut a 1″ piece of Crepe paper.Cut evenly spaced fringe on each side of the 1″ piece.Ruffle and scrunch with your fingers then unroll the fringe.Take the fringe doubling or tripling it up and then staple it to the edge of your hat. (You can bend the fringe to cover the staple.)To make the fringey ball on top, take a section of fringe and roll it up. Then secure it tightly with string in the middle, leaving long tails of string.Separate each side of the fringe and poof it up until it is a little ball.Put the string through the hole at the top of the hat and secure the tails with a piece of tape on the inside.

You have a party hat! There are other ways I decorate the hats. But they are all more or less versions of the two techniques above. I like to decorate each one differently. They take a little bit of time to make but afterward you can keep them and bust them out for any party to make it extra festive. (ps: I think this is pretty straightforward but I’ll try to answer any questions in the comments below.)Do you want to know why every Pinterest wedding (aka fake wedding shoot) is super tiny and only has ten people at it? Because decorating a small space is easy. And more importantly: decorating a small space costs significantly less than decorating a big space with the same amount of stuff. It’s never your friend.) So if your wedding plans involve a big empty space (think social hall, rec room), it’s understandable if the prospect of decorating might be… daunting. Big empty spaces come with their own set of challenges: tiny details are liable to get swallowed up, but trying to tackle the question of scale without destroying your budget is hard.
Which is why the answer for big empty spaces is often less about how you fill it, and more about how much you can fill it. Aka buying inexpensive decor in bulk. Think: paper streamers, honeycomb decorations, balloons, and anything else you can buy large quantities of, fill lots of space with, and not spend a million dollars on. But how do you do that without making your wedding look like a children’s birthday party? The answer is: it’s all in the execution. So when our friends at Oh Happy Day launched their brand new party shop this month, we were pretty excited. While the online shop features some things you’ve probably seen before (honeycomb decorations, streamers, balloons), this #lazygirl is very into the idea of having it all in one place, curated by someone with a designer’s aesthetic, so I can give my Googling a rest. We thought we’d use the launch of their shop as an excuse to show you a bunch of different ideas for decorating big empty spaces with lots of cheap (cute) decor.

Because with a cool idea, bulk decorations in a big empty space can actually look way more stylish than the intricate details you see on those fake weddings on Pinterest. Just… don’t tell Pinterest I said that. To Make: A cool oversized ceremony backdrop. Bonus: this design is scalable, so make it as huge as you want for a really oversized backdrop. To Make: Have a space with really tall ceilings? Use giant balloons to make floating centerpieces that pack a lot of punch. Or: If you don’t want to bother with helium (more on that below), stick big balloons to a wall for a big ass ceremony backdrop. To Make: A photo booth backdrop (or to highlight any other part of your reception.) To Make: You don’t need to go for broke to make a cool backdrop or statement wall. Some strategically placed washi tape will suffice. Use: Bright Balloons (6 for $6) To Make: Sometimes you just gotta FILL the space. Colorful balloons are a cheap and effective way to do just that (and I think these dip-dyed ones would look super cool.)