easy diy christmas decorations pinterest

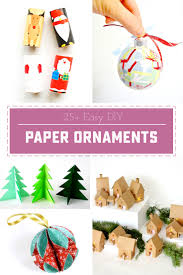
/2013/11/26/felt-christmas-tree-ornament/ on this server. Your technical support key is: 36fb-5376-1756-6707 and be sure to provide the technical support key shown above.Share with your friends! I know, I know. There are other things going on in the world than Christmas. For example, my birthday is this month. My friend is leaving work for new adventures. My neighborhood is selecting a new Association President. But, c’mon guys its Christmas! You can’t blame me for wanting to spruce up my life (and yours!) with some Christmas cheer. And anyone who knows me knows that I love to make things out of paper. I’ve got printables, planners, boxes, gift tags and MORE. Well, it turns out that I’m not the only one! There are at least 20 other people who like both Christmas and paper enough to make ornaments out of them. DIY Paper Ornaments are a great option for Holiday decor because they are inexpensive, light weight, in many cases they store flat and take up almost no room.

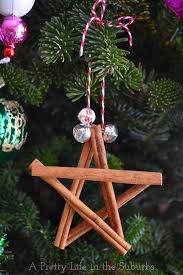
Any of these would be perfect for a newlywed couple starting their Christmas collection, or for classrooms or even the office.Share with your friends! My name is Kayla and I am a Graphic Designer. That means that I love pretty things, and also that I like to make free printables! I'm so happy that you've stopped by to visit my blog, and I hope you will follow me on Facebook, Twitter, Google +, Pinterest or Instagram!! (Yeah, and I'm totally addicted to the internet). 25+ Kid Friendly Valentines Free Meal Plan Kit with Inventory Printable Valentine’s Day CardsThis weekend we Christmas-ified our home! The tree is up, the mantel is decorated, the banisters are wrapped and the Christmas music is playing! How much do I love this time of year?! While we were decorating our tree, I had a thought about making some type of ornament with cinnamon. I’ve been seeing a lot of cinnamon dough ornaments around and thought they would smell so nice! But I didn’t feel like tackling a big craft project with all the stuff we were busy doing already.
I LOVE these kinds of projects! And I love that they’re homemade, and so easy that the kids can make them too! My kind of activity! Have a Merry Day!The average American household goes through over 600 baby food jars during baby’s first year.
beautiful christmas ornaments to buyThat’s a lot of empty glass baby food jars! Personally, I’ve always hated throwing away small jars. Every time I am washing one out in the sink I think to myself, “There must be something else I can do with this, right?” Baby food jars are especially adorable and begging to be upcycled. I mean, there are just so freaking many of them.But don’t worry, mamas—help is here. The world is full of crafters, and I’ve found some of the most genius baby food jar crafts out there. Seriously, these baby food jar crafts are completely epic, and completely doable. Check them out in the slideshow and get crafting.
Which baby food jar craft is your favorite? Let us know in the comments below.More Upcycled Craft Projects:101 Things to Do with a Mason JarDIY Upcycled Tin Cans: Turn Them into VasesDIY Upcycled Door Mat Be a Momtastic InsiderGet Advice, DIYS, Free Samples & More! Thanks for signing up!30 Amazing DIY Christmas Wall Art Ideas In these cold days the best you can do is to stay in your warm home and make something fun. For example decorate your home with decorations that you will make. If you have decorated your Christmas tree now is time to decorate the walls. It will look amazing with some Christmas decorations. You can make Christmas tree on your wall with branches or string lights. Interesting décor for your walls are also the reindeers. You can make them from paper or wood. Signs with best wishes are also part of the wall décor. We can help you with some amazing ideas, you just have to get crafty. Here are 30 great examples of Christmas wall art. Recent posts in Decorations

I absolutely love bell jars! My favorite holiday decorations are small vintage bell jar ornaments with sweet little snow scenes in them! I have been wanting to make some of these tiny cloche ornaments for a long while now, but have had a really hard time finding the little glass belljars anywhere. Recently I was at the dollar store and saw some plastic wine glasses. They were the right shape, so I decided to give it a try, and they actually turned out to be a pretty fun substitute! These little ornaments are easy to make! I had so much fun making them, I went back and bought more wine glasses to make more! *Large Circle or Scalloped Circle Punch (optional) Step 1: Cut Glasses- Gather up your plastic wine glasses. They come with bottoms, just throw those away, you don’t need them. The stem of the glass is just a bit too long, so I cut mine down a little with a dremmel with a grinding attachment. You can cut the stems with a utility knife, but it is a lot easier to break them that way.
If you have a dremmel, I would recommend using that. Step 2: Make Bottoms- I used a paper punch to cut out my chipboard bottoms. I think it is around 3 or 3.5 inches wide with a scalloped edge. I also used the punch to cut out my scrapbook paper to cover the chipboard with. I cut out paper for the top and bottom. You can draw circles and cut them out instead of using a punch. I just think it makes it a whole lot easier if you have one. When you have all of your circles cut out, you are ready to glue. I used rubber cement to glue the paper to the chipboard. Let the glue dry. Step 3: Make the inside- First, lay out your trinkets on your circles. Once you know where you want them, glue them down with some hot glue. Next, run a bead of hot glue around the bottom of your wine glass. Center the glass on the paper bottom and press down, glueing into place. With a funnel or rolled up paper pour some glitter into the top hole for snow. Step 4: Make the tops- First you want to add the hanger part to your beads.

If you want to use pipe cleaners, cut one in half. Then push it through he bead and twirl it around the bottom of the bead so it will stay in place. At the top of the bead make a nice sized loop with the other end of pipe cleaner and twist it together at the top of the bead. If you wish to use twine, first cut a long piece of twine. Fold the twine in half and push it through the bead. Double knot the twine loop at the top of the bead and then double knot the ends below the bottom of the bead and snip off any excess. Next, run a bead of hot glue around the top opening of the wine glass and glue the bead right side up to the top, sealing in your jar. Now you want to finish off the area where the bead and glass meet because it is not so pretty. I took small pieces of pipe cleaner and wrapped around the spot securing with glue in the back. And now they are ready to hang on your tree, yay! Although they are not quite as awesome as their vintage counterparts, I really love how they turned out!