diy christmas decorations for my room

It's a harsh reality: we all want to do Christmas decor DIYs, but the busy holiday season is always packed family and friends. We want to spend money to "deck the halls" but are saving our pennies to buy Christmas gifts. Hopefully this post will be sweetness to your eyes, ears, wallets, and Christmas decorations. Today I'm sharing five simple DIY Christmas decor projects that can each be had for less than $15, and all the materials are available on Amazon Prime! Now you can make your home festive, save your money for that new/old Nintendo NES Classic for you kid (err, I mean, husband), and have another reason to stay in your flannel PJs longer. Read on to see all the projects ... Two weeks ago I ordered all the things you will see in the five projects below. I made a list of Christmas decor I would like to have in my home or give as gifts to my friends, then got on Amazon and made it happen. Well, certainly you can find a lot of this stuff elsewhere; but so many people have Prime accounts, and their two-day free shipping is perfect for these kinds of little last minute projects.

When these boxes, loaded with every single one of my supplies, arrived on my door step, I was thrilled. I didn't even have to leave my house! Every project required something I had already, but I wanted to pick projects with small materials lists, using things most people have on hand. Some of supplies I ordered you might already have or could get cheaper while you are out and about doing your holiday errands. Doing this would make some of these projects even cheaper.
best christmas lights in boston areaIn my world, time is often more valuable, and I loved knowing I could get the supplies on my doorstep.
bedroom wall decorating ideas picturesI did choose one primary material that inspired each individual project.
room decoration for welcome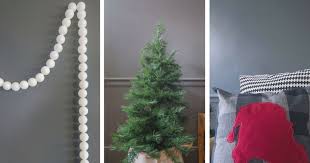
Here is the list of primary materials. This is the easiest pillow DIY you will ever do. It's really fun and festive for the holidays, and it's also a great gift for friends or teachers. Here is what I purchased: Square Tartan Pillow Cover Felt Works 12 X 12 Felt Pick out a simple Christmas shape and print it out on your computer. I always search for Christmas silhouettes such as "Santa silhouette" or "reindeer silhouette." You will find many "free to use" vectors or printables.
cheap wedding ideas for summer weddingsPrint out the image.
bedroom decorating ideas for black furnitureI chose this Santa silhouette.
diy christmas tree ornaments pinterest
Cut out your pattern and trace your shape. Cut out your shape and iron. This step is optional. A little trick I have up my sleeve for keeping the felt in place is a little bit of hot glue. Spread the glue in the middle. Do not put the glue on the edges where you will sew. The hot glue will not hold for long. It is just to keep the felt in place. Iron the felt silhouette in place. Hand stitch around the edges. This took a little time, but if you have a sewing machine and sewing skills it will be much faster. It would also go faster if you had more separation between stitches. I thought about this halfway through but I was already committed. Insert a pillow (not pictured). I use my everyday throw pillows for holidays. When Christmas is over I only have to store the pillow cover. I love the look of potted Christmas trees. I have them on my porch, in my son's room, and in my entryway. I wanted a simple, inexpensive, yet stylish planter for my trees.

Here's what I bought with Amazon Prime: Cotton Linen Collapsible Laundry Bucket (small) Metallic Gold Spray Paint You will also need masking tape or painter's tape for this project. Measure and mark, from the bottom, the same distance all the way around the laundry basket. Tape the top of the laundry basket. Keep the top semi-open so you can stick your hand through and push out the wrinkles as you spray. Spray paint the basket. Two to three coats will work best. Allow a couple hours to dry then take your tape off. Place your potted or small Christmas tree in your planter. I love these the bohemian tree skirts from Anthropologie but I just can't bring myself to spend over $270 for a tree skirt. I ordered a fringed yoga mat/tapestry on Amazon and I was able to accomplish the Anthro-"boho" look for much less ... $260 less! Here is what I bought on Amazon Prime: COR Hippie Beach Towel Yoga Mat Wall Tapestry either hot glue gun, sewing machine, or heat-n-bond (all optional)

Fold the tapestry in half. If you like the look of a smaller tree skirt then this option is for you. Pull it out of the package and you are done. Use the tree skirt for a wall tapestry, table cloth, or beach blanket after Christmas is over. Option 2: For those who like a bigger, more prominent tree skirt... Cut the tapestry between the pattern. Stop cutting at the inner medallion pattern. Cut around the inner medallion to make a hole for the tree base. Flip the tapestry over and fold the edges along the cut. Iron the folds in place. Do this for all the cut edges including the hole for the tree base. Run a light strip of hot glue down the folded edges. You can chose to sew or use Heat-n-Bond instead. Hot glue will not work if you will wash your skirt Iron the edge down. The heat of the iron will flatten the glue. It will also melt hardened glue, so give it time to dry. Glue and iron the curved edge of the center circle All that is left is to put it under your tree

I love the look of bead garland on trees, walls, mantels, and staircases. Here is an inexpensive way to accomplish bead garland in your Christmas decor. Here is what I purchased on Amazon Prime: 1 X 48 Beer Pong Balls - You want to buy these instead of normal ping pong balls. They are cheap, unmarked and softer than the ping pong balls you get at an athletic store. Here is what I used: Separate each set of floss into two. This is so you can have two tassels. I only had one of each color in the Amazon package so this was necessary. If you buy embroidery floss elsewhere you can just buy two of each string. Make a loop with some of the excess string. Feed the string through the loop. Cut off looped ends and wrap the top of the loop with string. (I used the gold to wrap the top) Take the string you want to go through the garland of ping pong balls and thread it through the top loop of the tassel. Tie and knot, and now you are ready to string your ping pong balls.

String your ping pong balls. Slide each one down to the first tassel. At the end of the strand, thread your string through the top of the second tassel loop and tie a knot. Your garland should be neatly ended with a tassel. Of course, if you don't like white, these ping pong balls would be easy to spray paint any color you choose. I love fringe stockings, but fringe is expensive. I found these inexpensive Turkish towels on Amazon and thought it would be the perfect fabric for my Christmas stockings. The best part ... they are fringed! Here is what I purchased with Amazon Prime: Beach Cover Up Towel Other things you will need: Cut the fringe off and save for later. Draw a second line outside your traced line. Use a ruler to mark 1/4 inch outside your traced line and draw your second line. Cut along the outside line. You will sew along the inside line. Repeat steps 1-6 for the second side. Place your two sides together. You don't have to worry about placing the two "right" sides together because this Turkish towel doesn't have a right and wrong side.

Sew along the inside line. Turn the stocking right side out. Take the fringe excess and lay it behind the stocking. Fold the excess fringe over and cut. (Leave room for sewing). Sew together the fringed piece into the cuff. Turn the cuff right side out. In other words, the sewn seam should not be out. Place The cuff fringe down inside the stocking. The "right side of the cuff", when inside the stocking, will be touching the "wrong side" of the actual stocking. Line up the edges. Make sure the outside seam of the cuff is lined up with the inside seam of the stocking and pin together. Sew around the edge of the top of stocking. This will sew the cuff to the stocking. Pull the fringe out and fold it over the stocking. Cut a strip from a scrap of fabric. Fold both edges in and iron. Fold again and iron. Then run it through the sewing machine along the folded edge. Make a loop out of your sewn strip. Attach your loop to the inside of the stocking.