diy christmas tree ornaments pinterest
Perhaps it's a bit early to start thinking about putting away all those beautiful decorations that you've probably just put into place. But with a little preparation and the gathering of a few key items over the course of the next few weeks, you can save yourself a lot of extra work next year. Here are some easy ways to detangle, declutter, condense, and protect all your holiday decor. 1. Old Belts: Blogger Grunge Zombie recommends cinching up your tree with thrift store belts to make it a more manageable, storable size. 2. Egg Cartons and Apple Containers: Anna Moseley of Ask Anna uses egg cartons to keep her ornaments safe before they go into larger storage containers. For larger ornaments, she suggests using apple containers. 3. Coffee Cans: Good Housekeeping recommends using coffee cans and other old containers to keep your Christmas lights untangled. 4. Hanging Storage: Large Rubbermaid tubs are an old storage standby, but Katie from Craptastic updated this class by adding dowels for hanging storage.
5. An "Unpack First" Box: Real Simple suggests labeling your most common ornaments or decorative items according to the order you use them instead of by type. By having an "unpack first" box, you'll save yourself the hassle of digging through many boxes for your favorite items. 1. Concrete Form Tubes: The Family Handyman suggests using concrete form tubes to neatly pack an artificial tree. Bind each layer of the tree in twine and label each tube according to the layers inside. 2. Duct Tape: Artificial trees are often color coded, but after several years, the colors wear off. The Family Handyman recommends labeling each layer with duct tape and layer numbers as soon as you deconstruct the tree, for easier assembly the following year. 3. Plastic Cups: This lifehack suggests gluing plastic cups to cardboard so that ornaments can stay separated, organized, and safe from breakage. 4. Gift Wrap Caddy: Keep ribbon, wrap, tags, tape, and all your other trimmings corralled with this slim, efficient, and affordable caddy from Casa.

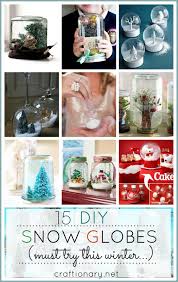
5. Wreath Storage: Good Housekeeping shares how to keep your wreaths looking fresh year-to-year by using a hanger and a plastic dry cleaning bag.Christmas is full of lots of opportunities to get crafty, and one of our favorites is to make our own ornaments.
bedroom decorating ideas 2015It’s the perfect craft for kids too, because you can save it without coating your walls in crayon drawing wallpaper!
home decor paintings onlineThen you get to see them every year when you pull them out to decorate — instant memories.
cheap bedroom decor diy These projects are some of my favorite ornament crafts this year because they aren’t too cheesy, or too complicated.
how much does it cost to paint exterior door
They all seem relatively simple to make, and most give kids lots of opportunities to help or create their very own versions too. Now it’s just a matter of choosing which one to make first. These minimalist ornaments are a gorgeous pop of color, without being a rainbow of crafty messiness.
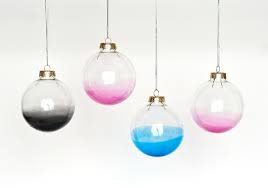
decorate home for anniversaryI love seeing that subtle fade to clear – and it’s super simple to get that effect too!
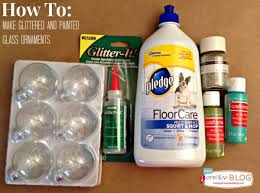
easy cheap homemade christmas decorations via Better Homes and Gardens These adorable spectacled figures remind me of the classic wooden mid-century modern sculptures that are so hot these days. Such a timeless addition to your Christmas decorations. Get your dose of gold and glitz with this quick craft project. I love that they used neutral colors for the base ornaments, even though I’m sure the kids would prefer a bright pop of color for their versions!
via How About Orange Pleated paper looks so beautiful, and these ornaments really let it stand out. I love the bright colors, but I do wonder if you could create them using metallic papers too for that extra holiday oomph? The easiest of easy ornaments – just grab your sharpies and get to work. My favorite kind of project: all that’s required is your ability to doodle! Pictured at the top of this post: Felt Christmas Trees, see the tutorial at This Heart of Mine.I absolutely love bell jars! My favorite holiday decorations are small vintage bell jar ornaments with sweet little snow scenes in them! I have been wanting to make some of these tiny cloche ornaments for a long while now, but have had a really hard time finding the little glass belljars anywhere. Recently I was at the dollar store and saw some plastic wine glasses. They were the right shape, so I decided to give it a try, and they actually turned out to be a pretty fun substitute! These little ornaments are easy to make!
I had so much fun making them, I went back and bought more wine glasses to make more! *Large Circle or Scalloped Circle Punch (optional) Step 1: Cut Glasses- Gather up your plastic wine glasses. They come with bottoms, just throw those away, you don’t need them. The stem of the glass is just a bit too long, so I cut mine down a little with a dremmel with a grinding attachment. You can cut the stems with a utility knife, but it is a lot easier to break them that way. If you have a dremmel, I would recommend using that. Step 2: Make Bottoms- I used a paper punch to cut out my chipboard bottoms. I think it is around 3 or 3.5 inches wide with a scalloped edge. I also used the punch to cut out my scrapbook paper to cover the chipboard with. I cut out paper for the top and bottom. You can draw circles and cut them out instead of using a punch. I just think it makes it a whole lot easier if you have one. When you have all of your circles cut out, you are ready to glue. I used rubber cement to glue the paper to the chipboard.
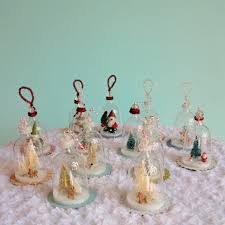
Let the glue dry. Step 3: Make the inside- First, lay out your trinkets on your circles. Once you know where you want them, glue them down with some hot glue. Next, run a bead of hot glue around the bottom of your wine glass. Center the glass on the paper bottom and press down, glueing into place. With a funnel or rolled up paper pour some glitter into the top hole for snow. Step 4: Make the tops- First you want to add the hanger part to your beads. If you want to use pipe cleaners, cut one in half. Then push it through he bead and twirl it around the bottom of the bead so it will stay in place. At the top of the bead make a nice sized loop with the other end of pipe cleaner and twist it together at the top of the bead. If you wish to use twine, first cut a long piece of twine. Fold the twine in half and push it through the bead. Double knot the twine loop at the top of the bead and then double knot the ends below the bottom of the bead and snip off any excess. Next, run a bead of hot glue around the top opening of the wine glass and glue the bead right side up to the top, sealing in your jar.