christmas decorations to make from wood

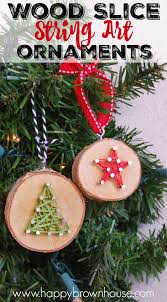
Login Join the Hip2Save Family Sign up for our newsletter The links in the post below may be affiliate links. Read the full disclosure. If you like making homemade Christmas ornaments, try this easy and frugal craft using sliced pieces of wood and paint. This project offers a unique way to up-cycle any wood you may have on hand and also makes a thoughtful gift idea. Note that I used mesquite wood that I had at home and cut the pieces with a table saw. If you do not have access to a saw, you can purchase sliced birch pieces online or at your local craft store. DIY Sliced Wood Christmas Ornaments: 3/4 inch thick sliced wood about 3-4 inches in diameter small screw in eye hooks (from hardware store) holiday colored ribbon or twine craft acrylic paint of various colors small holiday themed or monogram stencils if desired (I used the Martha Stewart brand) Directions: Paint and embellish wood slices as desired and let dry. Screw in eye hooks to the top of each ornament and embellish with a ribbon or twine.
You could also drill a hole towards the top of each circle and tie the twine to hang instead of using eye hooks. To make the Santa ornaments pictured above, first paint the top 1/3 of the wood slice in red and the bottom 1/3 in white. It’s best to use two coats of paint and let dry in between coats. Add a small red craft pom using glue for Santa’s nose or a red dot of paint. To make these chalkboard inspired ornaments above, first paint two coats of black paint or chalkboard paint on one side of the wood and let dry. Then use white paint and stencil a holiday related image or monogram letter. To create this snowman pictured above, first paint entire side of ornament white and let dry. Then use a pencil eraser tip to stamp on circles with black paint for eyes and mouth. Use orange paint for the nose and pink or flesh colored paint for cheeks. Written by Lina for Hip2Save. Lina is a proud mom of 2 small kids who loves photography, all holidays, cooking, thrift store makeovers, bargain shopping, and DIY makeovers.

Or what do you do when an outstanding, but pricey, deal is posted and you want to save it for discussion with your significant other? Well, now you're in luck! No more searching through pages of posts to find the coupon or the deal.
outdoor christmas lights for sale australiaSimply add the post to your HIP List and access it at your convenience.
metal wall decor stars How Does the HIP List Work?Whenever you find a great deal that you want to come back later to, just click on the HIP List icon located on each post (see images below) and the information will be saved in your account. When logged into your account, you will then see your HIP List on every page. If you're wanting to print a certain deal, article, or the Weekly Store Matchups from your HIP list, click on the small blue printer icon in the upper right corner of the HIP list.

That will allow you to customize the information that you want or don't want to include in your HIP list so you're only printing the information that's most important to you! If there are deals that you are not interested in keeping on your list, just click on the minus button to remove it. Now, just print your customized HIP list whenever you're ready to go shopping and snag some "Hip" deals!I shared in a recent post memories of chopping down a Christmas tree from the forest by my parent’s house when I was a child. Cutting our own Christmas tree is a tradition I’ve continued with my own family, though we go to a tree farm to find our perfect tree. Our Christmas tree each year is filled with a random assortment of ornaments that all have memories associated with them. We have never had a “theme” tree, but one day, I’d love to have a “rustic” themed Christmas tree, filled with wood ornaments and other decorations made from natural materials. I was recently asked if I wanted to take part in a blog hop where we made Christmas ornaments using our Cricut machines!

Heck yes I did! I immediately knew what I wanted to make… ornaments made with slices from the trunks of our old Christmas trees (we save one slice each year). I asked my husband if he would pull them out from the Christmas decorations for me. He asked me what I was doing with them and when I told him he said “You’re not going to paint them! I disagree with him 100% on this point! Wouldn’t it be nicer to have our old tree trunk slices hanging on our tree as decorations than sitting in a box going to waste? Reminding you of so many fabulous Christmas memories??? Since I’m in the Christmas spirit, and didn’t want to pick a fight, I went back to the drawing board. A year and a half ago, Stephanie from Garden Therapy, invited me to go to the tear down day at the local Home and Garden Show because a design team was having to scrap the materials from their display. We scored a ton of fence panels and small wood posts. I decided to use the later for this post.Making something old new again…
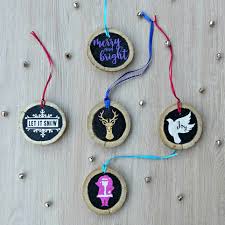
Saving it from the landfill… Inventing a new and creative way to reinvent the item from it’s original purpose. I had The Hubs, cut one of the wooden posts into slices. I sanded it down using our Dremel (though you could use sandpaper) and we were good to go! Now, I’ve seen a lot of people making ornaments out of slices of wood, I know there is nothing new about this concept, BUT one of the things that I love about my Cricut Explore Air 2 and my subscription to Cricut Access, is that there are over 30,000 images that I can chose from to cut using my Cricut, or if I’m feeling so inclined, I can upload my own images. I had a ton of fun going through the Christmas images and picking some of my favorites for my ornaments. Read on to learn how to make DIY Upcycled Wood Christmas Ornaments or your own! -Slices of wood (we used upcycled slices from some old fence posts, but you could also use slices from a Christmas tree trunk or slices from a large tree branch.)
–Dremel with sandpaper head or regular sandpaper and some good old fashioned elbow grease –Cricut Explore Air 2 or your favorite Cricut Explore machine -Vinyl (I used Cricut’s Gold Glitter Vinyl from their assortment pack) -Drill and drill bit (We use a Ryobi Drill) -Optional: Mod Podge in your favorite finish Step 1: Sand your wood slices so that the front where you’ll be applying your paint and vinyl is nice and smooth. I used the sanding head on my Dremel to get this done quickly, but you can also use regular sandpaper and good old fashioned elbow grease. Step 2: Paint the front of your wood ornament with chalboard paint. I left a border around the edge of my wood ornament that was approximately 1/2 inch. Step 3: While your paint dries, open Cricut Design Space, select your designs and cut on your glitter vinyl. Make sure that you measure the front of your ornaments to see how big you can cut your designs. If you like the designs I used, feel free to use my design file here.

Step 4: Weed your vinyl and transfer it to the front of your ornament. Step 5: Drill a hole in your ornament and thread the ribbon through for hanging. We did this step last because I wanted to see how the design was positioned before drilling. Optional step: I found that my Let It Snow design wasn’t sticking to the front of my ornament very well. I don’t think the wood was sanded quite as well as the other pieces and the design was a bit more intricate. I ended up putting 2 layers of Mod Podge on top to help seal the design to the wood. Apply the coats thinly and let dry thoroughly between each application. I’m so happy with the way that these DIY Upcycled Wood Ornaments turned out. They would make a beautiful addition to a rustic themed Christmas tree, and I think they would also make great handmade gifts. I think next Christmas I might host a craft night and make these with girlfriends! Want to check out the Christmas ornament designs that my blog hop friends designed Check them out below!