best way to paint an exterior steel door

As I write this post about oil-based paint I realize that the information is quickly disappearing from both common knowledge and usefulness today. If you live in California I don’t even think you’re allowed to buy oil-based paint anymore (at least not in any significant quantities). The landscape of house painting has been changing ever since water-based paints were first introduced by Sherwin-Williams in 1941. Kem-Tone, as it was called proved that water-based paints were a possibility. And it’s no secret that water-based, or latex paints, are easier to work with, better for the environment, and longer lasting than most oil-based paints. But there is still a place for oil-based paint today. And if you live in an old house, knowing how to work with oil-based paint is almost a requirement. What You Need To Know About Oil-Based Paint Slow-Drying – Oil-based paint is notoriously slow drying and the reason we have the saying “It’s like waiting for paint to dry.”

Most oil-based paint takes about 8 hrs to dry enough to recoat as opposed to latex paint which takes around 2 hrs to recoat. This may sound like a problem at first as it definitely slows down the whole process. But this slow drying allows oil-based paint to flow out better and provide a smoother finish than latex paint. This slow process allows brush marks to level out remarkably well. Good Ventilation – If you’re working with oil-based paint you need better ventilation than you do with latex paint. Make sure to open windows and put a fan in the doorway to pull in fresh air. Oil-based paints usually have a much higher VOC content than latex paints which is why the extra ventilation is needed. Yellows in Dark Areas – If you have old oil-based paint on your closet’s baseboards chances are it’s pretty yellow. Light colored oil-based paints are notorious for yellowing with age and in dark areas, The more sunlight it gets the less it yellows. If exposed to more sunlight the yellowing will fade away though, and though today’s oil-based paints have gotten better about holding their color it’s still a problem.

They will usually say “For Oil-based Paints” on the brush holder. Hard Finish – One of the qualities of oil-based paints that manufacturers have struggled to create with latex paint is a hard durable finish on enamel paints.
home decor style trends 2014For doors, trim and moldings nothing beats the hard, durable finish of an oil-based enamel paint.
interior design shops online australiaAnd that hard finish makes it an excellent choice for doors and windows because that hard finish eliminates the sticking that often happens with latex paints. The hard finish also unfortunately prevents the paint from being as flexible as latex which is why old oil-based paints begin to crack and chip off. Temperature swings and expansion of the surface eventually breaks the harder paint film of an oil-based paint.

Difficult Clean Up – If you’re painting with an oil-based paint the clean up is a bit more involved. Oil-based paint is pretty much impervious to water so you’ll have to use paint thinner or mineral spirits to clean your brushes. Here’s some tips for using mineral spirits: Make sure the area is well-ventilated. Pour some into a bowl and vigorously mix your brush for about a minute. Pour the used portion into a sealable metal container. Repeat this process until the mineral spirits comes out clear and the brush is clean. Dispose of the used thinner or mineral spirits at your landfill’s hazardous waste drop off. And there is one last thing you need to know about oil vs water based paints . . .I would think it’s obvious to most people the mixing a can of oil-based paint with a can of water-based paint wouldn’t be a good idea, but I’m talking about something else here. If you are painting oil-based paint on top of latex paint then you have to prime the latex first.
Latex paint and oil-based paint expand and contract at two different rates. So, if you paint oil-based paint on top of a latex paint without priming first, the latex will flex so much underneath that the oil-paint will quickly fail. You can get away with painting a latex paint on top of an oil-based paint without primer, but just to be safe, it’s always a good idea to prime first when you are switching from one type of paint to the other. Hopefully this has been a good “primer” (<—Sorry, I couldn’t resist the painter humor) for working with oil-based paint. If you have any tips I may have forgotten please share them in the comments below.Painting, Siding and Exterior The house I’ve been remodeling was built in 1978, and the exterior paint colors did nothing to hide its age. The aluminum siding was a shade of beige that had aged into a dull mustard tone, and the trim was a rust-colored reddish brown. The homeowners hated the look, but the metal was still in decent shape, and they didn’t want the expense of re-siding the entire house.

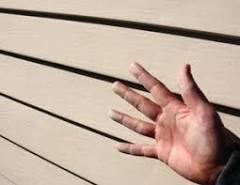
A new paint job was the solution. However, over time the original paint coat of the siding had developed a chalky film, caused by the old paint film wearing away. The chalk had to be removed before slapping on a new coat. We had a lot of prepping and painting ahead of us. Here’s how it went.On any sort of painting project, surface preparation is absolutely critical for any hope of success. Obviously, you need to remove any loose dirt or debris. There was also a lot of shrubbery to cut and remove for unhindered access to the house walls. The chalk that coated the old aluminum siding posed the biggest obstacle for this project. If you wiped your hand across it, you’d draw back a dirty, yellow palm. This stuff seemed to cover every square inch of siding and made for a lousy painting surface.To remove it, I turned to my trusty pressure washer, a heavy-duty Maxus unit that was equipped with a detergent tank. First, I washed down each wall with a garden hose to remove the loose dust, and then filled the detergent tank with Krud Kutter Pressure Washer Concentrate specified for house siding.

When applying a detergent with a pressure washer you have to lower the pressure and use the right nozzle—a low-pressure tip. This means you won’t have the power to throw the detergent as far and as high as with a high-pressure setting, so if there’s more than one level to your house then you’ll need a ladder. I sprayed on the detergent over the entire wall of the house, working from the top downward, and allowed the chemicals to agitate the surface for a few minutes, per the Krud Kutter instructions. Before spraying it off, I could already see the murky chalk substance dripping down the walls with the detergent.To clean it off, I switched nozzles and returned the washer back to a high-pressure setting. When washing metal siding, it’s best to get the nozzle as close to the siding as possible, which makes the most use of the powerful water stream. I worked my way down the ladder, blasting away the detergent and chalk, cleaning one wall at a time. Sheets of chalky water streamed off the house like dirty milk.

It featured a pivoting nozzle specifically designed to save time and effort. You can complete jobs faster, work more safely and more easily by aiming the stream directly at the work surface without overreaching—very nice when you’re on a ladder. Just twist the grip, and the head of the wand pivots 90 degrees up and down, so there is no need to stoop, bend or kneel to get to hard-to-reach places. The nozzle also twists to enable side-to-side work. The Pivot Nozzle is ideal for overhead work. In my case, pointing the nozzle straight up to spray the house soffits would have resulted in all the water cascading back down on top of me. By pivoting the nozzle, I could stand to the side, spray upward and avoid the ensuing waterfall.Even after all the pressure-washing, there were still traces of chalk that I hit with some detergent and a soft-bristled carwash brush on an extension handle. The chalk was stubborn. To ensure longevity of the new coat we made sure to choose a high-quality acrylic latex paint that would withstand the weather and cling to the metal surface despite any leftover traces of chalk.