fastest way to paint a house exterior
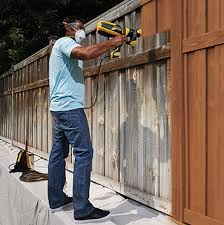
If you have a wood fence that needs a facelift, you can grab a paintbrush and spend several days on the project. Or, you can use a sprayer and finish in an afternoon. With a sprayer, you won't have to dab into tight corners or go over the same spot several times to replenish paint soaking into hungry wood. Sprayers, such as a Wagner FLEXiO, shorten the job, while providing maximum coverage and a streak-free finish. If you've recently built your wood fence, you'll want to let it season for three weeks to a month before applying paint or stain. Moisture in unseasoned wood can cause warping, and paint adhesion will also suffer. Wait for dry weather and begin painting in the early morning before the sun heats the wood. Wood that’s hot can cause the paint solvent to evaporate too quickly, causing cracks and other defects. It goes without saying that a windy day is not a good day for spraying -- choose a calm day for the best results. Professional painters call the process of scraping, cleaning and masking for paint jobs “prepping.”

Whenever you use a sprayer, prepping should involve drop cloths to protect surrounding vegetation, sidewalks and landscape features from overspray. Don't forget to put a drop cloth immediately under the section of the fence you're painting to catch drips. If your fence has been previously painted, prepping also includes scraping off all peeling or chipping paint. A power washer gets this job done quickly and efficiently -- just remember to let the fence dry thoroughly before applying paint. If the fence needs repairs, it's better to do these before you paint so you can hide any new screws or wood filler. Setting Up the Sprayer Unless you're painting a small section of fence, you'll save money by buying paint in 5-gallon buckets and using a FLEXiO 990. – It is quick to set-up the sprayer and get it primed for painting.The sprayer pump attaches to the 5-gallon bucket it, and you can move both at the same time as you progress along the fence line. Adjust the nozzle to give broad coverage while still affording you the ability to focus in corners and crevices.

All FLEXiO sprayers come with nozzles you can adjust as needed -- an advantage over conventional airless sprayers. One of the cardinal rules of paint spraying is to maintain a uniform 6- to 8-inch distance between the nozzle and the surface you're painting. Be careful not to arc off at the end of the stroke – use a steady back-and-forth motion. When painting rails, set the nozzle to spray a vertical pattern, and move the gun back-and-forth. When painting panels, you can use the same method, but it's a good idea to go back over your work in the perpendicular direction with the nozzle rotated 90 degrees. This creates a crisscross pattern that eliminates streaks. Even if your fence needs two coats, it can take just a weekend to give it a completely new look that will impress the neighbors. You’ll love the results!How long does it take for exterior paint to dry? Exterior paint generally dries within a few hours. Oil and latex paints dry at different times, but oil-based paint takes longer to settle.

The quality of the paint also determines the time for drying. What are some good types of outdoor paint that work on metal? Can I Use Exterior Paint Indoors? How long must primer dry before painting? Humidity and cold weather can slow down drying times for paint. It is best to paint during a temperature range of 50 to 85 degrees Fahrenheit for effective drying.
living room decorating ideas bright colorsApplying paint in shaded areas also prevents the paint from drying too fast.
diy room decor framesIt is recommended that painters apply 10 percent more thinner when painting in direct sunlight or hotter conditions to maximize painting time.
exterior house paint colors white
Regardless of whether the paint is oil or latex, purchase the best paint to avoid applying multiple coats. Learn more about Home Maintenance How long does it take semi-gloss paint to dry? It takes approximately 2 hours for semi-gloss paint to dry, depending on the type of paint used. While paint may feel dry to the touch after about an hour,...
cheap wholesale home decor How long do you have to wait between coats of paint on trim?
interior decoration online jobs Waiting 24 hours between each coat of paint on trim allows the previous coat to dry evenly and smoothly.
wall decor stickers buy onlineThis ensures that each subsequent coat goes on jus... How long does it take for paint to dry?

Exactly how long it takes paint to dry depends on many factors, but the average is usually between 6 and 12 hours. This varies depending on the type of pai... Does Rust-Oleum make glow-in-the-dark paint? Rust-Oleum Glow in the Dark is a specialty spray paint that glows in a green color for four to eight hours after being exposed to light. Why should you take videos of your home? How do you find local concrete contractors? What is the official website for Menards? How do you get a manual for a Sentry fire safe? What are popular bathroom paint colors? What are some good paint types for an interior door?To avoid extra work when doing exterior painting, it is wise to have a good plan of attack. Important considerations should be the sequence and procedures you follow in applying your paint. Here are some guidelines: When it comes to painting, all days are not created equal. And don't assume that just because a day is rain-free that it is a good day to paint.

If the day is too hot or too windy, your paint may dry too quickly to enable it to form the most protective film. In fact, painting in the wrong conditions can even lead to premature flaking and peeling of the paint. So, when should you paint? Here are some tips that will help you get the best results with exterior latex paints: Although many of the steps involved in painting wood siding are also required when painting other surfaces, different procedures are sometimes necessary with certain types of exterior surfaces. These include masonry, aluminum siding and vinyl siding. Masonry exteriors, including stucco, brick and concrete block, can all be successfully painted with top quality paints, but you must take certain precautions when painting these surfaces. To begin with, recognize that good surface preparation - as with all paint jobs - is critically important when painting masonry. To that end, the masonry should be sound; free of dirt, powdery dust, and loose chalk;

and rough enough so that the primer or paint can get a good grip on the surface. The best ways to clean and roughen the surface are to use a bristle brush, wire brush or - in extreme cases - a sandblaster, followed by a thorough rinsing. New unpainted masonry or unpainted masonry that has aged less than a year presents some special challenges: for one, it may still contain moisture from the original mixing; for another, it may have a high degree of alkalinity. Aging and weathering will naturally rid the surfaces of these problems. However, if you are unwilling or unable to wait for this to happen, take these points into account: Oil-based and vinyl water-based paints can fail prematurely if applied directly to a masonry surface aged less than one year; an alkaline-resistant sealer must first be used. 100% acrylic latex paints tend to resist the alkaline nature of fresh masonry, so they often can be applied directly to these surfaces. However, it is still best to apply an alkaline-resistant primer or sealer, even with a 100% acrylic latex paint, if the masonry is less than four weeks old.
Be it previously painted or unpainted, entails other considerations. If efflorescence (white, crusty salt deposits on the surface of the material) is present, for example, you must remove it during surface preparation by scraping, wire-brushing or sandblasting. Furthermore, if your masonry shows a tendency to produce efflorescence - or if it is very porous or chalky - you should apply a sealer or latex block filler before painting. Finally, if you are applying water-based latex coatings to any type of masonry, it is advisable to first dampen the surface. Pre-dampening will allow the paint or coating to dry more slowly, which in turn, will enable it to form a more durable film. To paint aluminum siding, begin by cleaning the surface in the standard fashion, either by power washing or hand-washing with warm, soapy water. Then rinse the surface thoroughly. The unique challenge with aluminum siding is surface oxidation, which occurs when bare metal is exposed due to extreme chalking of the original factory applied coating on the surface of the panels.

If your siding has unsightly white oxidation, carefully remove all of it by rubbing it away with steel wool. Rinse off the surface to eliminate any residue. And, if any bare aluminum is exposed, spot-prime those areas with a quality acrylic latex primer. When it comes time to paint, use a top quality 100% acrylic latex California Paints exterior paint. This type of paint will provide good adhesion to aluminum siding and excellent resistance to fading. From an aesthetic standpoint, top quality latex paint forms a thick, uniform paint film that will faithfully duplicate the original surface profile of the siding, be it smooth or textured. Vinyl siding is one of the best exterior surfaces to paint. and one of the easiest. All you need to do is to clean the siding thoroughly and remove any mildew with a bleach solution, then rinse the surface clean. Be sure that you don't skimp on the quality of paint you use when painting vinyl siding. Because the siding panels may have a slick surface, you need a top quality paint with excellent adhesion characteristics.