best time of year to paint front door

Video Playback Not Supported Painting the outside of your house is best done in the fall or spring when temperatures are moderate, and the weather isn’t too hot or too cold. The best temperature range for painting outdoors with latex paint is from 50° to 85° F. Painting during hot weather can cause latex paint to dry too fast, resulting in brush marks and clumps of paint on the paintbrush. Painting when it’s too cold can cause the paint to not adhere well to the surface, resulting in cracking and peeling. Volatile organic compounds (VOCs) are chemicals released into the air by some paints when they dry. Breathing VOCs isn’t good for your health or the environment, so be sure to buy low VOC or no VOC paint when painting inside or outside your home. Watch this video to find out more. Temperature Range for Painting Your House (article) Painting Outside in Cold Weather (video) Preparing the Outside of Your Home for Painting (video) Painting the Exterior of Your House (video)

How to Paint Anything Outside (article) Danny Lipford: Besides raking leaves, one of the other things that’ll be getting done around the neighborhood during the fall is painting. That’s because the best time to apply latex paint is when the outside temperature is moderate. You know if it’s too hot, it dries too quickly, and it leaves some ugly brush marks on the surface that you’re painting. And clumps of paint will get in the brush, making it real hard to do a quality job. Now if it’s too cold, it just won’t bond as well to the surface where you’re applying it. So now is the time to get it done. But while you’re doing a little painting, think about painting green. Not the color, but “green” as in with the environment in mind. Now you’ll see that most water based, latex paints contain VOCs or volatile organic compounds. As the paint dries, it gives up these chemicals, which are released into the air for about six months after you’ve applied the paint.
Inside your home that means a strong odor and poor air quality for you. But outside it means ozone pollution and the release of smog forming chemicals into the atmosphere. None of that stuff is good stuff, so many paint manufacturers have begun reducing the level of VOCs in their products to address this concern.
best christmas lights display in dallas txNow it’s possible to find paints, like this one, which is actually formulated to give off about nine times fewer VOCs by weight.
best paint for outdoor decor So check the label before you start, and get that painting done before the cold sets in.
decorative christmas tree base Videos You May Like Painting in Cold Weather

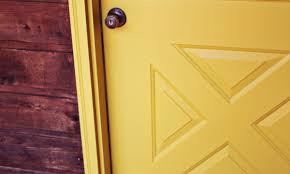
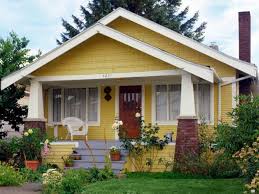
Ideal Temperature for Painting Outdoors Temperature Range for PaintingIt can be intimidating to paint. It’s messy and can take a long time, especially if you need to use ladders or paint multiple rooms. But it can be really rewarding too! You can show off your personality through colors and I love having the little memory of, “Remember when we painted this….” Recently I painted my front door—and I love it! It was the perfect little weekend project. Here are my top 5 painting tips.1. Take your time choosing the perfect color. If you can, take a few paint swatches home and tape them up to the door or wall you plan to paint. See how the colors look with the surrounding area. Think about how this color will look through the seasons. I choose a bold yellow for my front door because I wanted a bright accent to my otherwise neutral/wooden home. 2. Choose the perfect finish. Most paints come in flat (sometimes called matte), satin, semi gloss and high-gloss. For my door I choose semi gloss.
I usually prefer flat because I like how it doesn’t reflect light. But for a front door semi gloss or high-gloss is a better option because it can be cleaned more easily. 3. Prep the area you plan to paint. For me this included giving my front door a good wipe down. You don’t want to paint over dust or debris because it will leave bumps in your paint. When painting a dark surface to a lighter color (like a dark brown to yellow) it is a good idea to first paint on a layer of primer. I forgot to buy primer. No biggie, an extra coat of paint did the trick for me.4. Tape everything and watch your floors! Tape around edges and hardware. I choose to leave my door on its hinges as I painted. You could choose to take your door off, but be sure to hang up a thick cloth to keep flies out as much as you can as you paint. This is also why it’s a good idea to complete a front door paint job in the spring or autumn months; you don’t want your door open or off it’s hinges during months of super hot or cold weather.

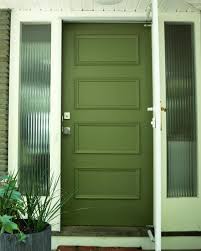
And be sure to cover your floors with newspaper or drop cloths as you work, especially if you have carpet. Painting can be messy but if you prepare then you can easily keep the mess under control and keep clean up time to a minimum.5. This is essential for DIY painting projects, no matter how large or small. And you are absolutely required to order pizza if you have friends who are kind enough to help. Pizza + painting = a good time!Side note: To paint the frame or not? I choose to paint the frame/trim around my front door because I loved the idea of making the color pop and I felt committed to my color choice. But you can totally choose to not paint the frame, making the door color a little bit subtler and it will feel a little more a part of the house. Just a preference choice—don’t be afraid to do what you want! Exterior acrylic paint protects your exterior door from the elements. Interior enamel paint is tough and durable, but don't make the mistake of painting your exterior door with it.
The best paint for exterior doors is exterior acrylic paint because it is flexible and contains mildewcides designed to protect your door from harsh conditions. No paint will stick to dirt, grease or rust, so you will have to clean the door before you paint. Use a synthetic mini roller to give your door a fast and easy face-lift. Plan to paint on a day with no rain in the forecast and the expected temperature will be 50 to 90 degrees Fahrenheit. Paint during the time of day when the sun is not shining directly on the door, as the heat can cause paint blistering. Remove the doorknob, lockset and the kick plate with a screwdriver. Cover the floor under the door with a drop cloth. Use the edge of a putty knife to remove old tape or decals from the door. Apply a mildewcide cleaner to any mildew. You can also use a bleach solution of one part bleach to three parts water. Clean the door with soapy water. Use a degreaser to remove sticky residue left by tape. Allow the door to dry completely before painting.

Mask the hinges, the peephole, the door knocker and the weatherstrip on the bottom with painter's tape. Mask the perimeter of glass panes with a straight line of tape to ensure a uniform paint line. Tape everything that you don't want painted. Remove peeling paint with a putty knife, but don't force the paint off. Use a wire brush to remove rust from metal doors. Sand heavily weathered doors with a medium-grit sanding pad to smooth rough areas or flaking paint. Remove sanding dust with a clean, damp cloth. Omit this step if the door is in good shape. Fill holes or dents in the door with wood putty or a filler for metal, using a putty knife. Allow the filler to dry completely. Sand the entire door with a fine-grit sanding pad to ensure a smooth substrate for paint. Wipe away the sanding dust with a clean, damp cloth. Remove dust from corners of paneled doors using a small paintbrush. Apply a bead of painter's caulk to cracks and seams around panels or windowpanes using a caulking gun. Remove excess caulk with a clean, damp cloth.

Allow the caulk to dry completely. Fill a paint pan with stain-blocking primer. Slide a 4- or 6-inch synthetic mini roller cover onto a mini roller handle. Apply a thin coat of primer, ensuring that you roll the edge of the door. Use the tip of the roller to cut in around hinges and hardware and to access the corners of recessed panels. You can use an angled paintbrush for cut-in, but it will leave brush marks in the paint. Roll out drips or thick areas. Allow the primer to dry for the time recommended by the manufacturer. Sand the door lightly with a fine-grit sanding pad to smooth rough fibers brought out by the primer. Wipe off sanding dust with a clean, damp cloth. Apply a second coat of primer to the door and allow it to dry completely. Clean the paint pan with soapy water. Stir the paint thoroughly to evenly distribute the color pigments. Pour it into a paint pan and place a clean roller cover onto the roller handle. Dip the roller into the paint and roll it back and forth over the grid lines to load the cover evenly.

Use the tip of the roller, or an angled paintbrush, to cut in around hinges and hardware and to access the perimeters of recessed panel doors. Smooth out thick lines with the roller. Roll the paint onto the door using long, smooth strokes. Complete the centers of recessed panels first, moving to the larger area of the door last. Continue in this manner to paint the door completely. Allow the paint to dry for the recommended time. Leave the door ajar to prevent the edges from sticking. Apply a second coat of paint to the door and allow it to dry for 24 hours before replacing the hardware. Things You Will Need Screwdriver Drop cloth Putty knife Mildewcide cleaner Bleach Painter's tape Wire brush Medium-grit sanding pad Clean cloths Wood putty Filler for metal Small paintbrush Painter's caulk Caulking gun Paint pan Stain-blocking primer 4 or 6-inch synthetic mini roller covers Mini roller handle Angled paintbrush Paint Paint stick Tips Warnings Photo Credits Siri Stafford/Photodisc/Getty Images Suggest a Correction