best paint for a exterior door

Exterior acrylic paint protects your exterior door from the elements. Interior enamel paint is tough and durable, but don't make the mistake of painting your exterior door with it. The best paint for exterior doors is exterior acrylic paint because it is flexible and contains mildewcides designed to protect your door from harsh conditions. No paint will stick to dirt, grease or rust, so you will have to clean the door before you paint. Use a synthetic mini roller to give your door a fast and easy face-lift. Plan to paint on a day with no rain in the forecast and the expected temperature will be 50 to 90 degrees Fahrenheit. Paint during the time of day when the sun is not shining directly on the door, as the heat can cause paint blistering. Remove the doorknob, lockset and the kick plate with a screwdriver. Cover the floor under the door with a drop cloth. Use the edge of a putty knife to remove old tape or decals from the door. Apply a mildewcide cleaner to any mildew. You can also use a bleach solution of one part bleach to three parts water.

Clean the door with soapy water. Use a degreaser to remove sticky residue left by tape. Allow the door to dry completely before painting. Mask the hinges, the peephole, the door knocker and the weatherstrip on the bottom with painter's tape. Mask the perimeter of glass panes with a straight line of tape to ensure a uniform paint line. Tape everything that you don't want painted. Remove peeling paint with a putty knife, but don't force the paint off. Use a wire brush to remove rust from metal doors.
used wedding reception centerpieces for saleSand heavily weathered doors with a medium-grit sanding pad to smooth rough areas or flaking paint.
decorate house for winterRemove sanding dust with a clean, damp cloth.
bedroom decor ideas 2014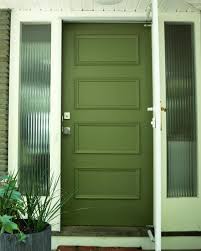
Omit this step if the door is in good shape. Fill holes or dents in the door with wood putty or a filler for metal, using a putty knife. Allow the filler to dry completely. Sand the entire door with a fine-grit sanding pad to ensure a smooth substrate for paint. Wipe away the sanding dust with a clean, damp cloth. Remove dust from corners of paneled doors using a small paintbrush. Apply a bead of painter's caulk to cracks and seams around panels or windowpanes using a caulking gun. Remove excess caulk with a clean, damp cloth.
gold christmas tree table decorationsAllow the caulk to dry completely.
home decoration stores bostonFill a paint pan with stain-blocking primer.
inexpensive christmas tree decorating ideas
Slide a 4- or 6-inch synthetic mini roller cover onto a mini roller handle. Apply a thin coat of primer, ensuring that you roll the edge of the door. Use the tip of the roller to cut in around hinges and hardware and to access the corners of recessed panels. You can use an angled paintbrush for cut-in, but it will leave brush marks in the paint. Roll out drips or thick areas. Allow the primer to dry for the time recommended by the manufacturer. Sand the door lightly with a fine-grit sanding pad to smooth rough fibers brought out by the primer. Wipe off sanding dust with a clean, damp cloth. Apply a second coat of primer to the door and allow it to dry completely. Clean the paint pan with soapy water. Stir the paint thoroughly to evenly distribute the color pigments. Pour it into a paint pan and place a clean roller cover onto the roller handle. Dip the roller into the paint and roll it back and forth over the grid lines to load the cover evenly. Use the tip of the roller, or an angled paintbrush, to cut in around hinges and hardware and to access the perimeters of recessed panel doors.

Smooth out thick lines with the roller. Roll the paint onto the door using long, smooth strokes. Complete the centers of recessed panels first, moving to the larger area of the door last. Continue in this manner to paint the door completely. Allow the paint to dry for the recommended time. Leave the door ajar to prevent the edges from sticking. Apply a second coat of paint to the door and allow it to dry for 24 hours before replacing the hardware. Things You Will Need Screwdriver Drop cloth Putty knife Mildewcide cleaner Bleach Painter's tape Wire brush Medium-grit sanding pad Clean cloths Wood putty Filler for metal Small paintbrush Painter's caulk Caulking gun Paint pan Stain-blocking primer 4 or 6-inch synthetic mini roller covers Mini roller handle Angled paintbrush Paint Paint stick Tips Warnings Photo Credits Siri Stafford/Photodisc/Getty Images Suggest a Correction Front doors require a certain amount of maintenance, such as regular cleaning, weatherproofing and the occasional (well-deserved) spruce up.

A new coat of paint is a welcome opportunity to choose a new color and refresh your home’s first impression. Choosing a new color for your home’s front door can be overwhelming whether you’re going for a fresh coat of neutral or taking the plunge with a high-contrast hue. Tape a few swatches (ours came from a midcentury paint palette) to your door. The colors will appear quite different outdoors than they do inside your home. Consider the other colors in your home and its surroundings. In our case, the natural greens in the plants surrounding the entryway served as inspiration, as well as the gray undertones in the flagstone accent and the home’s siding and roof. Weathered flagstone in the sidewalk has a natural, mossy patina that complemented the green colors in the most flattering way. It’s easier to achieve a professional-looking finish if you take the time to remove the locks and knobs. You can tape them off and paint around them, but it’s not the best approach.

If you’re considering new hardware, now is the time to get it. Clean the door and use a palm sander to roughen the flat surfaces of existing paint (Image 1). This will help give the primer a better surface to adhere to. You may have to hand sand in the crevices and around the trim (Image 2). Wipe the entire door clean with a dry rag to remove dust (Image 3). Depending on the final color, you may want to get the primer tinted. By doing so, you’ll probably need fewer coats of paint. However, we used just white primer and two coats of green paint (about 1 quart of paint). When the primer has dried, run the sandpaper lightly over the surface to level out any irregularities in the primed finish. Use the rag to clean off the sanding dust. Begin by brushing inset or trim details by hand with a paintbrush so that you can lay an even base coat. Use the brush to feather out the edges of the paint so that there are no drips. Use a small 6” roller with a low-nap texture (or a high-density foam roller) to apply a smooth, consistent paint application across all of the flat surfaces, including the edges of the door.