best exterior house colors 2013

We recently moved into a new home and have been busy re-vamping, tearing down, and re-constructing this/that in our new home. It’s been fun……but a complete learning process. If you’d like to see other Home Improvement Projects that we’ve been figuring out (from the help of friends, family, and the ol’ internet), be sure to check them out. I can’t tell you how many times I’ve wanted to learn how to re-wire something electrical. Like, a light fixture, a fan, an outlet. But I’ve been a little chicken because my mind always goes directly to imagining a billion watts of current, shocking my body….leaving me lifeless on the ground. I’ve been a little wimpy to do anything electrical because it sorta freaks me out.(well, until yesterday, to be exact…) Steve’s brother, Joe, is in town. He’s teaching Steve how to lay hardwood floors (which are looking BEE-AUTIFUL…..more on those another day! :) ) and while they were breaking for lunch yesterday, I asked Joe (who somehow knows how to do it ALL) to show me how to change an outside light fixture.
I was ready to learn. Maybe you’ve done this before and it seems pretty simple. But I always thought we should hire an electrician for such jobs. Because EEEEK…….what if I got shocked by those above mentioned billion watts of current?!?!
proper way to paint the exterior of a house After he taught me the first one…..
living room decorating booksI re-wired the other 5 light fixtures that I wanted replaced outside.
discount wedding supplies wholesale I still can’t believe I re-wired those little beauties! But even more than that……I can’t believe how simple it was. Goodbye little brass fixtures. You won’t be missed. 3 fixtures by the garage and 2 by the front door……..5 total fixture replacements in one afternoon.

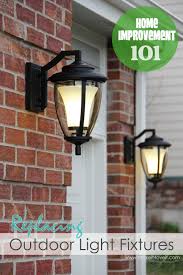
I couldn’t be more thrilled! And to top off yesterday’s excitement……these little lovelies just bloomed from the previous owners planting them maybe last year(??). And Steve pointed them out to me, just as I finished wiring the last fixture. Blooming flowers always bring a smile to my face. And now…….so does installing a new light fixture! **Keep in mind, everyone’s fixtures will be slightly different, so read your instructions. However, I think it’s really useful to see someone do it up close…..so hopefully this will help some of you.**You don’t want to shock your socks off. I’m going to show you the process of replacing our back porch light……because it was smaller and easier to manipulate while taking pictures. (And thanks again bro-in-law Joe, for helping while I took a trillion pictures!) First of all, start unscrewing/untwisting/un-clipping your old light fixture. Everyone’s is a little different…..so do what you need to, to remove yours from its mount.

Now, you should see some plastic caps covering your wire ends. There should be black wires, white wires, and some copper colored ground wires. (Again, yours may be a little different……but black and white seem to be pretty standard. But the ground wire could be another color.) Unscrew them right off and then untwist the wire ends. Then, screw your mount on. Every mount will be a little different…..so follow your instructions. And I just mounted my mount (the copper color pieces) to the old one (grey circle piece)….but you will probably mount yours right to your wall and over an exposed hole in the wall where all the wires come out. But, we just mounted right over this one. There’s generally another piece on your mount that can twist around so that you can mount your light perfectly straight. Adjust that as needed, and screw tightly into place. Next, grab the GROUND wire from the fixture and wrap it around the GROUND bolt (mine’s green) on your mount.

Screw the bolt down tightly to hold the wire on there securely. Next, twist the GROUND wire from your light fixture to the GROUND wire coming from your wall. Twist them together clockwise. Then, twist your wire cap on clockwise, securing the 2 wires together. TO TEST IT………give the wire from the light fixture a slight tug. It shouldn’t come loose. If it does, the cap didn’t secure around the two wires tight enough. So, remove the cap and re-wist the wires together and then the cap. Next, grab the WHITE wire from the light fixture and twist it together with the WHITE wire from the wall, twisting them together clockwise. Do the same with the BLACK wires. Screw the caps on these sets of wires and be sure they are secure. (If your exposed wires aren’t long enough to wrap around the other wires, trim some of the plastic casing away that’s covering the raw wires. You need about 1/2 to 1 inch of exposed wire to work with.) Next, bend all the wires closer together and try and fit them behind the light fixture base.
Then, secure your light fixture base to the wall, however yours was designed to be attached. Mine had two little screw covers to tighten down. Now, turn your power back ON and enjoy your handiwork!!! Now, save yourself some cash and install your own light fixtures. If you have always been a little nervous to try, you may really surprise yourself. ***I am not an electrician and am not sharing exact instructions as to how everyone’s light fixtures should be installed. This is only shared as an example of one way to install a fixture, for those who may need visual help. Make It and Love It is not responsible for any problems or accidents you may encounter while trying to install your own electrical fixtures.*** . . . . . . . . . . . . . . . Consumer Reports Picks for Best Interior Paints: 2013 Each year Consumer Reports comes out with their latest pick for best interior paints. Judged on performance, value, washability and durability, this year a new brand emerged with the highest scores of 65 paints tested.

Find out who, after the jump. Have a little extra paint? Use it to personalize your front door! This year's Consumer Reports winner for best interior paint is Clark + Kensington, a new line from Ace Hardware. Consumer Reports noted that it was "superb at hiding, leaving a smooth finish that resisted stains and scrubbing." Previous winners, such as Behr, Valspar and Benjamin Moore, continued to maintain a presence in the top three brands for each paint finish: Clark + Kensington - Satin Enamel, $32/gallon Benjamin Moore - Aura Satin, $68/gallon Kilz - Casual Colors Satin, $30/gallon Valspar - Signature Matte, $32/gallon Behr - Premium Plus Ultra Flat, $32/gallong Benjamin Moore - Aura Matte, $68/gallon Clark + Kensington - Semi-Gloss, $33/gallon Behr - Premium Plus Ultra Semi-Gloss Enamel, $34/gallon Valspar - Signature Semi-Gloss, $35/gallon Read more for the full ratings and great tips on how to choose paints: Consumer Reports, "Lab Tests - Interior Paints," March 2013