vintage christmas tree ornaments pinterest

As Christmastime approaches, so does the season of "ugly sweater" parties. Instead of buying a disappointing sweater you'll only wear once, let your creativity flow and make one yourself. It's simpler than you may think! We've rounded up some of the most popular DIY ugly Christmas sweaters on Pinterest that will inspire you to take out the glue gun and whip up something especially impressive. From bad to worse, these festive sweaters certainly live up to their “ugly” name. While there are many Christmas tree sweaters out there, this one takes it up a notch. You can literally be a Christmas tree with this fun and simple design. Get the tutorial here. RELATED: Holiday DIY: 6 last-minute home décor ideas This outfit is as tacky as it gets and absolutely perfect for your ugly sweater party. To make it yourself, all you need is a plain sweater and some seasonal ties. RELATED: 11 holiday DIY decorations for your porch, mantle and table from Brit Morin The country chic cottage

To make your own Rudolph sweater, get creative with some felt, pompoms and other accessories from your local craft store. The cards we drew This easy, affordable Christmas sweater wears its ugliness with pride. Take an old sweater, some garland, a mini tree skirt, holiday lights and a hot glue gun to make this Christmas tree come to life. Team up with your significant other to make a matched set. This duo reindeer sweater has been a huge hit on Pinterest for being hilarious and easy to recreate. We promise, you don’t have to be a master seamstress! Santa, reindeer, candy canes, snowflakes and a Christmas tree make an appearance on this busy holiday sweater. It’s so ugly, it’s almost cute. Peppermint candies are so festive and classic, no matter what time of the year it is, the sight and smell of peppermints always reminds me of the holidays. Peppermint Candy Ornaments are thrifty and quick to make, they’re a handmade project that is perfect for this time of the year, when we’re all running a little lower on money and time!
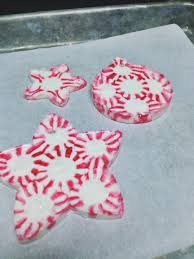
You could make a dozen of these edible ornaments at just a dollar per bag of peppermints! These melted candies aren’t just for the tree either! Use this method to create cute little edible toppers for cupcakes or brownies (what is more festive than the flavors of chocolate with peppermint?!). I first melted peppermints in cookie cutters after seeing the idea in an American Girl magazine, back in the 90’s (I’m pretty sure that a project centered around scalding hot, melted sugar would not make it into a children’s magazine these days).
best exterior paint colors with stoneAs easy as this project is, I had a difficult time finding anything similar to this online, so I decided to share it.
decorating ideas for guest room home office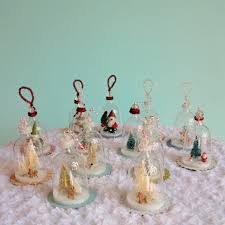
Include your kids in creating this fun craft project, spend an afternoon making homemade ornaments for decorating your Christmas tree this year! Metal cookie cutters are a must! I love using this: Vintage Christmas Ornament Set and this: Snowflake Set! Preheat oven to 350F. Line a baking sheet with parchment paper. Spray the inside of each cookie cutter with cooking spray. Lay cookie cutters on baking sheet and fill with a layer of peppermints.
home and wall decor coupon Bake for 3-9 minutes.
room decor ideas for guysKeep an eye on candy as it melts, remove from oven when candies have melted together.
paint for exterior signs Lightly coat a toothpick with cooking spray and use it to make a hole in each group of candies.
christmas door decorating ideas office
Let candy sit inside cookie cutter until it re-hardens. Once hard, carefully stretch out the cookie cutter, pulling it away from the candy, to pop out your ornament. Wrap these peppermint treats individually in plastic wrap, if you’d like. • Many of you have contacted me about a sealer that would be suitable for this project. Unfortunately I do not know of any available sealants that would work with these ornaments (the moister of sealers causes the candies to melt). Similar to a gingerbread house, these ornaments may not last for more than a season but it’s a fun (and inexpensive) project to create every Christmas season! • These ornaments are really so easy, but it may be helpful to make a trial run: Place one peppermint-filled cookie cutter into the oven to get an idea of how fast the candy will melt and how quickly it will cool and re-harden after you remove it from the oven. • Try turning down the temperature of your oven, so that candies will melt more slowly, if your candies are melting unevenly or at different rates.

• Squeeze as many peppermints, side-by-side, into your cookie cutter as possible. If peppermints melt into too thin of a layer, try layering peppermints in the cookie cutter to make a thicker, more sturdy, ornament. • Large, simply shaped, cookie cutters work best for this project. The more intricate the cutter, the more likely ornaments will break when removed from their cookie cutter mold. • Don’t forget to be careful around the hot metal and melted candy! This is a fun craft to make with children, just be sure to provide plenty of supervision. • Try not to handle the ornaments too much because they can get sticky, but they should be fine after they’re hanging on the tree. Here’s to a happy handmade Christmas!I absolutely love bell jars! My favorite holiday decorations are small vintage bell jar ornaments with sweet little snow scenes in them! I have been wanting to make some of these tiny cloche ornaments for a long while now, but have had a really hard time finding the little glass belljars anywhere.

Recently I was at the dollar store and saw some plastic wine glasses. They were the right shape, so I decided to give it a try, and they actually turned out to be a pretty fun substitute! These little ornaments are easy to make! I had so much fun making them, I went back and bought more wine glasses to make more! *Large Circle or Scalloped Circle Punch (optional) Step 1: Cut Glasses- Gather up your plastic wine glasses. They come with bottoms, just throw those away, you don’t need them. The stem of the glass is just a bit too long, so I cut mine down a little with a dremmel with a grinding attachment. You can cut the stems with a utility knife, but it is a lot easier to break them that way. If you have a dremmel, I would recommend using that. Step 2: Make Bottoms- I used a paper punch to cut out my chipboard bottoms. I think it is around 3 or 3.5 inches wide with a scalloped edge. I also used the punch to cut out my scrapbook paper to cover the chipboard with. I cut out paper for the top and bottom.

You can draw circles and cut them out instead of using a punch. I just think it makes it a whole lot easier if you have one. When you have all of your circles cut out, you are ready to glue. I used rubber cement to glue the paper to the chipboard. Let the glue dry. Step 3: Make the inside- First, lay out your trinkets on your circles. Once you know where you want them, glue them down with some hot glue. Next, run a bead of hot glue around the bottom of your wine glass. Center the glass on the paper bottom and press down, glueing into place. With a funnel or rolled up paper pour some glitter into the top hole for snow. Step 4: Make the tops- First you want to add the hanger part to your beads. If you want to use pipe cleaners, cut one in half. Then push it through he bead and twirl it around the bottom of the bead so it will stay in place. At the top of the bead make a nice sized loop with the other end of pipe cleaner and twist it together at the top of the bead. If you wish to use twine, first cut a long piece of twine.