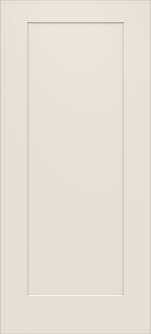
paint exterior steel door

Steel doors stand up to harsh environmental conditions and resist warping and moisture. These low-maintenance doors are primed for easy painting and are available in a variety of high-definition panel designs. Smooth fiberglass doors are easy to paint to match any décor, and feature an insulating core for energy efficiency. These low-maintenance doors won't crack, split or warp, offering years of trouble-free performance. Paint-Grade Oak Textured Fiberglass Doors Textured fiberglass doors combine a traditional wood-grain look with weatherresistant durability and won't dent or rust. They are available in econmical paint grade or stain grade in a variety of panel styles. Stain-Grade Oak Textured Fiberglass Doors Premium Textured Fiberglass Doors Wood doors provide natural beauty and warmth. A variety of styles and wood species are available. Create a unique entryway with the many decorative glass options available. For a durable finish, doors can be ordered pre-stained.
Serious Education ... plus the most fun you can have in metal finishing. How to paint a steel door Q. I recently bought a Stanley steel door with an oval cutout shape. After painting the surface with an enamel paint it easily comes off. No one seems to know what to do to make the paint stick. The door was a light grey color when I bought it new. A. I was looking into repainting my steel door, also. I found that you must sand down and prime the door before you paint. Use an oil-based primer. After priming the door you must lightly sand it before painting it. Also, if you are to use two coats of paint, it is advised to sand between coats. I would use a sprayed on primer and paint so as not to show paint strokes on the door itself. Q. A handyman painted my side door last summer. By March the paint had peeled off in three areas larger than a handprint. The painter primed, and painted several coats. There is a storm door near the repainted entryway. This time I would like to try to repaint and would like advise prior to starting the job.

The first door I took web and friends advice and used exterior latex paint.IT PEELED OFF EVERYWHERE , especially the window trim . Door #2 I changed to a low odor oil base paint, which by the way can be mixed to match any color , not only did it go on better ( I used a small sponge roller ) , it left a nicer finish and didn't peel off.
christmas door decorations with paperI'll NEVER use latex on a door again
cute ways to decorate your room with pictures I hope this helps .... Disclaimer: It is not possible to diagnose a finishing problem or the hazards of an operation via these pages. All information presented is for general reference and does not represent a professional opinion nor the policy of an author's employer. The internet is largely anonymous;
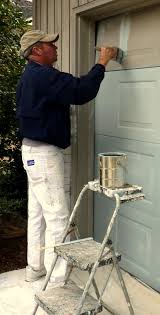
some names may be fictitious and some recommendations may be deliberately harmful. If you need a product/service, please check these Directories: JobshopsCapital Equip. & Install'nChemicals & Consumables Consult'g, Train'g, SoftwareEnvironmental ComplianceTesting Svcs. & DevicesUsed & Surplus © - Privacy Policy How Google uses data when you visit this site. Whether you like it or not, a street-facing, overhead garage door takes over a home's facade, forcing itself into the role of focal point. The front of a typical double garage often takes up a third of the typical ranch home's face. For this reason, if you have a garage door that needs attention it shouts that your whole home needs attention. You may not be able to paint your home's siding yourself, but anyone can paint a garage door. And a new-looking garage door goes a long way to boost your curb appeal. I've painted many garage doors. This time I stood back and took photos while my dear Mr. Lucky painted a client's.
Here is the step by step to help you do it yourself. There's a right way and a wrong way to DIY a garage door repaint. The wrong way takes hours, makes a mess of splatters on the concrete, and leaves gaps of old paint color at the ends of the panels when the door is opened. Here is the right way. As with all DIY projects, having the right tools and supplies is the first step to getting good results with the least effort. So, gather these materials. A clean 1-gallon work bucket. Old brush for dusting 5-in-1 tool or paint can opener Painting an overhead garage door is a whole lot easier than painting a front door. But some of the same cautions apply: Choose a windless day that's not too hot or too cold, and when you can work without distractions and interruptions. (Moms of young ones, take heart. In the time it takes a toddler to have his afternoon nap, you should be able to start and finish.) Ever notice that hanging pull on your garage ceiling? If you tug the red handle, you'll disengage the electric opener.

That's what you want. Now you're ready tomove the garage door up and down manually from outside. Use your stir stick to stir the paint, even if it was shaken at the paint store. Pour only a quart into a clean work bucket, like an empty paint can. Wipe the lip of the original can, replace the lid tightly, and set it out of the way. Begin brushing the door at the bottom. Move the door up manually so you are not stooping over to paint. Do not paint the gasket on the bottom edge unless it was painted previously and needs a repaint. Paint just one lengthwise hinged panel at time. Paint the extreme ends of the panels as best you can. If you plan to paint the trim surrounding the door, you don't have to be fussy about keeping paint off the trim. It's easier to paint the extreme ends of the panels when they are at the very top of the door opening, as above. You'll have to reach up or use the step stool to paint the them. When the panel you've finished is at the top of the opening, paint the edges of
both the upper and lower panels, the "lips" where they meet. Since this area does not receive much direct sun or weather, it's not necessary to go heavy with the paint, so do not load your brush. When you get to the top panel, make sure the drop cloth covers the ground before lowering the door. Use a step stool to stand on rather than stretching to reach the top panel. Check the entire door for runs, drips, and misses. Now's the time to paint the trim around the door. This homeowner chose to have the siding, the trim and the overhead door all the same color. It's a contemporary, no-nonsense look that is fine for modern homes. Next week we'll spray her brick foundation white, and brush the siding grey. The finished door looks like new. Painting the door took about an hour. If your door needs two coats for good covereage, you could put on a second coat the same day if the first coat isOr just wait until the next good painting day.