homemade outdoor christmas decorations for sale
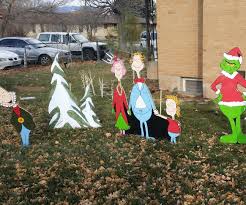
Show All Itemsfrom Master Creator Alan HatchLearn how to Make the Grinch Christmas Yard Art Decorations for Christmas.Absolutely nothing is more satisfying than a DIY Christmas. Why not make it memorable for all of your neighbors as well. I have tried my best on the following steps to help you make your own yard art decorations for Christmas, or any holiday for that matter. Making yard art just requires a little imagination, ingenuity and patience. I have been making and selling yard art for decades. It's second nature for me but if it is your first time do such a project I can tell you it's absolutely worth it in the end. You'll have a project that you can be proud of and you'll start to realize that you can do anything you put your time and effort into.Holidays:ChristmasHalloweenThanksgivingMothers dayFathers DayFourth of JulyMemorial Day Your only limited by your own imagination. The list of holidays and special events goes on and on. If you get stuck on a project you can always feel free to contact me with your questions and I will get back with you as soon as possible.

Step 1: Choosing Wood For Christmas Yard Art DecorationsWhen choosing a good style of wood to cut for Yard Decorations for Christmas or any other holiday, it is important to choose wood that isn't warped, that will stand up to the weather and get you the best results. Choosing wood that is easy to paint is also a consideration. For my wood yard art decorations I choose outdoor MDF plywood. You can buy these in a variety of sizes and can even have your local hardware store cut it for you in the length you need. I chose 3/4 inch plywood for this project. One sheet will give me all the characters. In this project I had The Grinch and the townspeople and a few whoville tree's thrown in. I made max and Cindy Lou also. Materials List:1- 3/4" 4X8 piece of plywood6-Metal Poles and brackets to secure to the back of the characters for display1-jigsaw with a scrolling bladescrewsPrimerAcrylic outdoor paintspray sealer clearcoat to protect against the weather.« PreviousNext »View All Steps Download
The holiday decorating itch may strike suddenly and without warning. Before you start, it's best to step back and develop an overall game plan. Resist the urge to simply "wing it."Pick a Focal Point - For example, if you have columns that frame your entryway, this may be where you want to start.
room decoration for welcomeWithout a focal point your house will just look like someone blasted lights out of a cannon all over your lawn.
painting house exterior how muchConsider the surface - Check your gutter thickness and shingle flexibility to determine how to best hang lights along the roofline.
wall decor living room diySome popular spots for outdoor Christmas lights include:
christmas tree decorated with crystals
Along your rooflines or eaves Atop bushes, hedges and trees Around pillars, posts or deck railings Around windows, door frames and other architectural features Near driveways and pathways Inside window boxes and planters Measure - Measure any straight line you want to adorn with lights.
easy cheap homemade christmas decorationsThis will help you decide how many strands you need.
home decor boutique ukAlso, measure the distance to your power source. No one wants a beautiful light display and no way to turn it on.Lights Galore - The number of lights you'll need to decorate trees and shrubs is a matter of personal preference. A good rule of thumb is 100 lights for every 1-1/2-ft of tree or shrub you want to cover. So a 6-ft evergreen needs at least 400 lights for a basic level of lighting.

Of course, if your goal is for your house to be seen from space, stagger two sets of lights side-by-side, or look for lights that are spaced closer together. Denser lights equal brighter lights. For more tips, see our Christmas Lights Buying Guide and Outdoor Holiday Lighting Ideas. Safety First - Use UL approved extension cords specific for outdoor use and look for lights rated for indoor/outdoor use. Check the Christmas lights package for this, the lighted length and how many strands to connect. Check your Lights - Frayed or damaged cords are a big NO. One faulty strand isn’t only a safety hazard, but could ruin your entire design.Light Color - Believe it or not, white lights are not all the same color. LEDs typically have a bluish tint, whereas incandescent bulbs are slightly orange. Hang them side-by-side and they will look mismatched. Lights can even vary based on manufacturer and how old they are. Make it easy on yourself and buy new lights.Light Clips - Forget staples, clothespins or any other contraption you’ve used in the past for mounting lights to your house.
Light clips are your new best friend. We have something for every surface, simply read the package to find the one that fits your application.Light Types - There are tons of different light types and colors – so have fun with them! Just make sure you group the same light-type together. For example, try using white lights on your bushes, but colored lights on your trees and entryway. Top it off with white icicle lights along your roofline.LEDs will save you money on energy costs and you don’t have to worry about them overheating.Icicle lights look great on the eaves of your roof – just make sure to cluster them together. If stretched too far apart the look is completely lost.For your bushes, try net lights. These are like a blanket of lights. Simply lay them on your bushes, and boom, you’re done. CautionAlways follow the manufacturer’s guidelines in regard to safety instructions, care and maintenance, and use to be on the safe side. Before you hang outdoor Christmas lights, decide what you're going to work on first and gather everything together.
This is where having a helper comes in handy. Start with bushes, then trees, any windows, the doors and finally the roofline. Good to KnowStep back as you go and make sure everything is shaping up the way you want it. Test Your Lights - Just because lights are new, they still need to be tested – on the ground. The last place you want to find out your lights are busted is on top of a ladder in the cold. Go ahead and attach your light clips at this point and make sure they're all in the same direction. Attach Lights to Shutters or Shingles - To attach lights to your gutters, use an all-purpose light clip. It works with any type of light. Hang the lights pointing up or down, just make sure they're all clipped in the same direction. If you don't have gutters, you can use the same clip to attach lights to your shingles instead. Simply flip the clip around. Attach Lights to Trees - If you're hanging lights in a tree, try using a light-hanging pole. Hanging poles are also great if you don't want to get on a ladder.