home decor craft diy
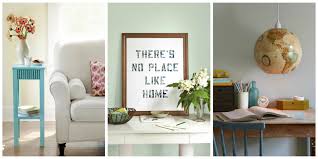
25 Gorgeous DIY Wreaths to Craft This Fall Spruce up every room in your home with these creative and simple DIY projects. There's No Place Like Home ArtThere's No Place Like Home ArtReward a great quote (we cribbed from The Wizard of Oz) with the gallery treatment, courtesy of this project adapted from Meg Mateo Ilasco's Crafting a Meaningful Home ($24.95; Step 1: Lay a piece of poster board on a flat surface. ) to spell out the phrase of your choice on the board, experimenting until you find a placement you like. (Use a ruler and pencil to mark horizontal lines for guidance.)Step 2: Spell out the phrase backward, then flip the stencils over (you'll be turning the board over when you're done, and the words will then read correctly). Trace the letters onto the board with a pencil.Step 3: Carefully cut out the letters with an X-Acto knife, then use hem tape to affix a patterned piece of fabric to the poster board. Flip the poster board over to reveal the finished artwork, then frame.

Vintage Painting CabinetVintage Painting CabinetTurn a thrifted piece of art into a useful storage space. 15 Festive Fall Door Decorations You'll Either Love or Hate the Fact That This '70s Décor Trend Is Back 8 Gorgeous Kitchen Trends That Are Going to Be Huge in 2017 21 Cozy Living Rooms You'll Want to Hibernate In All Winter Long 25 Decorating Tricks To Make Your Bedroom Feel Extra Cozy 9 Trendy Home Features That Are Actually a Huge Pain The 15 Most Over-the-Top Sorority Houses in the Country You Can Now Buy Honest-to-Goodness Farmhouse Decor at Target 50 of the Most Beautiful Country Homes Across America 21 Fresh Ways to Incorporate Barn Doors Into Your Home 11 Retro Diner Decor Ideas for Your Kitchen /home/Best-DIY-Projects-Home-Decorating-21078898 on this server. Your technical support key is: 3697-8e1a-1756-6707The 10 Paint Colors Designers Always Use Skip the professional decorator and whip up your own homemade decor instead.

The faded hues look fresh as napkins, but can double as placemats too. A Sweet Utah Home to Brighten Your Day
christmas decoration 2014 pinterestHouse LaundrySmall Laundry RoomsLaundry MudroomClever LaundryThe LaundryInexpensive LaundryDiy LaundryLaundry RenoAwesome LaundryForwardLaundry room is one of the most important parts of our homes but it is often neglected, especially in smaller homes.
christmas decoration 2014 pinterestCheck out these 10 great laundry room DIY projects for help. Home » Weekend Projects » 54 home decorating projects More: 8 cool DIY terrariums Decorative terrariums are hotter––and easier––than ever. Create your own tabletop garden in 30 minutes or less with these easy design ideas and instructions.36 Easy and Beautiful DIY Projects For Home Decorating You Can Make
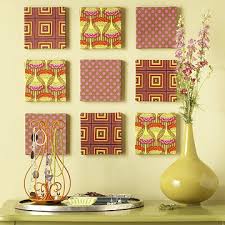
Make a triple trio of fabric-covered wall plaques to add spice and splash to a special space in your home. Designer Tari Colby wrapped three fabrics over artist's canvas squares and secured the fabric using a staple gun to make this quick, easy, and inexpensive textile display.Although Tari used 6x6-inch prestretched canvases as the foundation for this project, you can use any size for your wall art. Cut fabric 1-1/2 inches larger than your canvas on all sides.Wrap excess fabric to the back of the canvas frame, pulling it taut and smooth. Staple to the frame beginning at the center of each side and moving to the corners. Miter the corners and secure with staples.For a finish that's impervious to dust and moisture, Tari recommends brushing two coats of decoupage medium onto the fabric surface. Feel like royalty wrapped in this beautiful faux-suede throw embellished with a screen-printed crown and delicate black trim. Get instructions for the Royal Throw. Add design dash to a jute or sisal rug with a color-block paint treatment.
Bright color combinations such as the one shown are perfect for a playroom, work area, or dorm room. For a subtler tone-on-tone appearance, choose a combination of soft cream and deep taupe hues.-- 1- and 2-inch-wide painter's tape-- Behr semigloss latex interior paints: Bicycle Yellow 370A-3 (BY), Candy Coated 120B-5 (CC), Fresh Peaches 260C-3 (FP), Ocean Dream 580B-4 (OD), Peas in a Pod 430B-4 (PP)-- 2-inch flat trim brush1. Using both widths of painter's tape, a yardstick, and the weave of the rug as a guide, mask off a pattern similar to the one shown. For this rug, we used 1-inch-wide painter's tape to mask off the horizontal stripes and 2-inch-wide painter's tape to mask off the vertical stripes. Painted stripe widths vary from 6 to 13 inches.2. Dip the trim brush 1/4 inch into the paint color you're using for the upper-left rectangle, then pounce the brush vertically to fill in the section. Fill in the remaining blocks of the same color.3. Repeat with additional paint colors until all the blocks are filled.
Painting on fabric for pillows is easy: Draw a design in chalk, then fill in shapes with fabric paint (or acrylic paint mixed with fabric painting medium) using a slightly dry brush and quick strokes to allow the canvas to show through. Painting a different design on each side makes the pillows conveniently reversible. Resurrect an old beaded-board chest with a fresh coat of aqua paint to tie into the cottage-style color scheme of the bedroom and a lively fabric lining. Fold under the edges of a piece of fabric cut to fit and staple it to the lid. Do the same for each of the sides and the bottom of the chest's interior. Inexpensive and readily available online, unfinished wood candlesticks allow you to bring colors from your fabrics or wallpaper to your accessories. Stick with similar colors such as blues and lavenders for a more subtle display, or make a statement by using jewel tones in the grouping. Using a sponge brush, apply the stain over the candlestick. Wipe off the excess with a clean rag.

For more intricately carved areas use a flat artist's brush. Rub It On Wall Art Rub-ons applied to glass quickly update basic picture frames. Pair the designs with framed pieces of pretty patterned paper for a low-cost gallery. Draw together a room's colors with coasters made from circles of felt in different sizes. Freehand cut shapes or use a die-cutting tool. Tack the pieces together with simple stitches, adding beads to the embroidery floss for decoration. Bring color and interest below the bed with a ribboned bed skirt. Cut ribbons of various widths and colors 1 inch longer than the drop of a purchased skirt. Topstitch each ribbon along the top seam. Layer ribbons for more detail. Leftover spray paint is perfect for making these coasters. Purchase corner blocks in the molding section of a home center. While spraying, set the pieces on small cans for easy access to all sides.For durability, spray the painted blocks with polyurethane after they dry. Glue felt on the bottom to protect surfaces if desired.

Gather a few of your favorite fabrics and showcase them in an assortment of frames. Painting your frames all the same color will add unity to the collection. Magnetic Memo Board and Tacks A cookie sheet or jelly roll pan, minus the dough, doubles as a magnetic message holder. Measure your pan and cut scrapbook paper or wallpaper to fit. Use a corner rounder to round each corner of the paper. Secure the paper to the pan using double-stick tape. Back flat florist's stones with colorful images, and glue on magnets to hold your messages in place. Anna Maria Horner used her fabric to cover these old Fed Ex boxes and turn them into modern magazine holders. To replicate the look, cut the flaps off one end of the box. Cut off one corner of the box at an angle as shown in the photo. Wrap and fold the fabric around the box and secure with fabrics glue. Make a statement with a two-tone wooden bowl. Stain the inner and outer surfaces, using a sponge brush to pull color toward the rim but not onto it.

When the stain is dry, lightly wipe the flat side of a sponge brush containing very little stain over the bowl rim (don't press). Clean up any color that runs over the rim with sandpaper and then reapply stain where needed. Decorate with your colorful bowls or store nonfood items in them. Silk Scarf Room Divider Simply stitch an assortment of beautiful silk scarves together to create a patchwork effect. Play with patterns and colors to get an attractive combination. Stitch scarves together or use iron-on fusible webbing to make a panel in the desired size. Turn the top edge back, and attach to form a pocket. Insert a dowel or rod, and hang the panel as a pretty room divider, canopy, curtain, or tapestry. Turn ordinary items into coffee-table decor. Easy to switch when your room changes, these foam or wooden balls are wrapped with ribbon scraps, old tape measures, and leftover scrapbooking supplies. Place them in a pretty bowl for display. Turn pieces from a broken frame into a new fabric-covered photo display.

Cover a mat with batting and then fabric, securing the edges with hot glue. Cover the frame's cardboard insert with fabric and then glue the mat to the insert along three sides, leaving one side open to insert a photo. Connect two covered frames using ribbon as hinges, glued to the backs. Hang It on the Wall Hang the fabric-covered picture frames on the wall vertically for a new look. Create a custom frame to fit your decor or to give as a gift with a personal photo inside. Make plain tea towels worthy of display by adding special touches. Flour-sack towels are incredibly inexpensive (find them online for $1 or less), and it's easy to add a basic hand-stitched design, making this the perfect project for mass production. Spend a weekend making a set for your table or churning out gifts for friends. Trimmed Photo Frame and Box Need an easy way to personalize a purchased item as a special gift? Trim a picture frame with leftover pom-poms and a photo box with rickrack and ribbon.

Use adhesive dots to attach the pom-poms and double-stick tape for the ribbons. Transform a photo frame into a stylish home for your earrings. Remove the frame's back panel and decoupage the front of the frame with patterned papers. Staple wire mesh to the back over the opening. After embellishing, hang the frame on the wall or prop it on an easel. Cover your table in summer style by joining three bath towels trimmed in large rickrack. Wash and dry three bath towels and trims. See next slide for detail. Sew the towels together catching just the peaks of the rickrack in your stitch. Launder on a gentle cycle and hang to dry. Match your decor with this easy-to-make fabric-covered switchplate. See details on next slide. Supplies for Your Switchplate You will need a switchplate, tightly woven fabric, peel-and-stick tape, fabrics glue, crafts knife, and awl. Cut fabric 1/2 inch wider than the switchplate on all sides. Tape around the opening on the front of the switchplate.