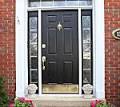
exterior house colors front door
You love black houses; we love black houses. Easy to admire but a bold move to make, not just any shade will do. We’ve asked architect and designer members of our Professional Directory for their favorite black exterior paints. Here, they’ve shed some light for when you’re ready to go dark. What’s your favorite shade of black paint? Photographs of paint swatches by Katie Newburn for Gardenista. Above: Top row, left to right: Farrow & Ball Railings; Benjamin Moore Midnight Oil; Benjamin Moore Carbon Copy; Farrow & Ball Off-Black. Bottom row: Benjamin Moore Black Forest Green; Benjamin Moore Black Panther; Farrow & Ball Pitch Black; and Benjamin Moore French Beret. Above: SF-based Butler Armsden Architects renovated a William Wurster home and had it painted in Benjamin Moore Carbon Copy, a rich black shade with a hint of purple. The architects used a flat finish for the body of the home and a soft gloss sheen for the trim. Above: This home by architect Roberto De Leon is painted in Benjamin Moore Black Forest Green.
The shade is discontinued, but can still be mixed on request. Black Forest Green was also a favorite pick of LA-based DISC Interiors (and, after seeing it in person, I myself am obsessed). Above: Another example of Benjamin Moore Black Forest Green. Williamstown, Mass.-based Burr & McCallum Architects painted this farmhouse with trim in Essex Green. Above: Stylist Arren Williams chose Farrow & Ball Railings for his own home (pictured here). Railings is not a true black, but functions beautifully in place of one. TheJenTurner Studio also used Railings on the exterior trim and front door of her home in Brooklyn. For details, see The Architect Is In: Tips from Jen Turner’s Grand DIY. The shade was also recommended by Charles Mellersh Design Studio in London. Photograph via House & Home. Above: Farrow & Ball’s Off-Black is a favorite of designer/fabricators MADE LLC in New York. Photograph via Farrow & Ball. Above: Owner Margaret Grade of Sir and Star restaurant in Marin chose Benjamin Moore Black Panther for a dark overhaul of her formerly white building.

This shade is in a tie with Pitch Black for the blackest of the shades recommended here. For more, see A Restaurant That Channels “The Birds,” West Marin Style. Photograph by Alexa Hotz. Above: Portland, OR-based Bright Design Lab used Benjamin Moore Midnight Oil on this home still under construction. The shade is a very dark gray with just a hint of brown. Above: NYC-based Steven Harris Architects used Farrow & Ball Pitch Black for a long exterior storage wall on this beach home in Montauk.
what color to paint front door on insidePhotograph by Scott Frances.
decorate my bedroom for free Above: SF-based Boor Bridges Architecture used Benjamin Moore French Beret on this home in Sonoma (still under construction).
best sugar cookie recipe easy
Architect Bonnie Bridges describes the shade as “the blackest black with an ever-so-subtle hint of blue.” Though black may be an unlikely pick for a home nestled among the trees, “It’s rich enough to be the backdrop to the vast site and amazing views,” she says. Can’t decide which color to paint your exterior? See the 10 Easy Pieces posts in our exterior color series: Architects’ Top 10 Grays, and White Exterior Paint Picks. What paint color should we profile next?
bedroom decorating ideas online , , , , , ,
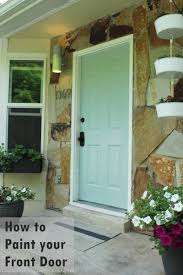
wall art stores in edmontonProbably the least expensive yet most impactful ways you can update the look of your exterior front entry is to paint the front door.
decorating a home office
Such a huge chunk of color, front-and-center, is certainly one of the most visual aspects of your front entry space. That’s why picking the perfect front door color and painting it correctly is vital if you want to give off the best possible first impression. It’s a simple and straightforward process. (Just be sure that you’re prepared to leave your door open the entire day.)Tired of your old door color? Let’s change it out.Look at the color(s) on your house. You’ll want to choose something that goes with the rest of the house, first and foremost. This example shows a house with a brown-tan-orangey rock face. These are not among the homeowner’s favorite hues, but they had to be taken into consideration before selecting a door color. Because orange and blue are complementary colors, and the previous door was quite dark, it was determined that a lighter/softer shade of warm blue would be nice. Many paint chips were collected that hovered around this idea, then they were taped to the door and analyzed.

(The color selected is called “Watery” by Home Decorators Collection, a lovely bluey-greeny-grey.)Take a bit of 220-grit sandpaper and start sanding your door face. Start by gently sanding the grooves, if your door has any. Tip: You want to sand away major imperfections, but you don’t need to spend forever sanding.Then move on to the flat surfaces. Looks like the color before ebony was a shade of cobalt blue.When performing a quick, light sanding, it’s helpful to keep in mind that you’re not necessarily out to achieve a uniform color in the sanding. Some sections are bound to need a bit more sanding; If you find yourself looking at an area that seems to need more sanding, go by feel instead of by look – stop sanding every few seconds and run your fingers over the area. If it feels smooth, no matter what it looks like, you can move on.Wipe down the door with a cleaning cloth. Or a baby wipe.When your wipe-down has dried completely, it’s time to tape off everything you don’t want painted.
Note: It’s a good idea to simply remove all hardware before painting. That way, you can get an even sanding done, and you don’t run the risk of paint dripping on your doorknob or keyhole.This example avoids removing the door’s knob and lock because those pieces had to be rather trickily installed by a locksmith due to some weird issues on our old door, so in place they will remain, covered securely with tape.Also, because you will be painting the inside lip of your door (the face that touches the doorjamb), it’s a good idea to run a piece of painter’s tape down the edge.Grab your exterior paint. I recommend (along with many painting pros) a combination paint + primer to save yourself a step while achieving a uniform paint coat. Otherwise, use two coats of primer and then exterior paint on top of that.Admire your chosen color. I think you’re gonna like it here, Watery.There’s a method to painting a door that makes it look great at the end, and I’m going to share it with you now.

Begin by painting the angled perimeter of a top panel (one of the six rectangular panels on this door) with a brush. This first coat should be a light one; don’t worry if some of the old paint color shows through in parts. You’ll get it covered soon enough with the second/third coats.Paint the entire panel, then move on to the neighboring panel, still with a brush. Stop there for a minute. Make sure, as you’re painting these, that the edges of any new paint brush strokes are smoothed out immediately. If you leave them, even for 30 seconds, they can start to set up a bit, which makes for a very un-smooth end result. Be constantly watching for drips and drops and paint running, and swipe them away immediately.Next, for the first coat, you can take a high density foam roller and paint the flat parts around the two panels you’ve just detailed. Again, watch the edges of your new paint swipes; if there is even a small bit of excess paint that is left to sit there, it will start to set up and make an ugly bump or line when you paint over it later.
Don’t forget about the inside of the panels, if applicable. Continue this order – brush grooves, check paint edges, roll perimeter, check for paint drips, roll interior, watch out for weird paint globs – for every panel on your door.Don’t forget about the doorjamb lip(s) – paint the knob one for sure, and the hinge one if you want.Let everything dry (typically for about four hours, if you did as you were supposed to and kept the first coat of paint a light one).Grab your 220-grit sandpaper, and do a very light sanding all across the door. You’re not trying to sand through this paint coat, you simply are sanding away any slight paint bumps if they came up because you forgot once or twice to smooth out the edges of your new paint swipes. Don’t worry, we’ve all been there. Just sand ‘em down.For the second coat (and third, if you want…this tutorial did three coats), continue in the same method of painting the angles around each panel. Paint as though you’re following a wood grain, even if there isn’t one on your door, or if it’s buried under 28 other coats of paint.