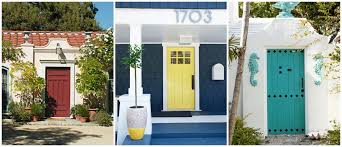
exterior door paint black
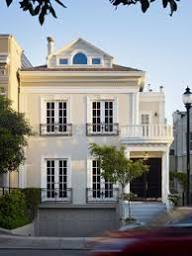
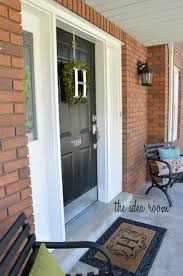
Front doors require a certain amount of maintenance, such as regular cleaning, weatherproofing and the occasional (well-deserved) spruce up. A new coat of paint is a welcome opportunity to choose a new color and refresh your home’s first impression. Choosing a new color for your home’s front door can be overwhelming whether you’re going for a fresh coat of neutral or taking the plunge with a high-contrast hue. Tape a few swatches (ours came from a midcentury paint palette) to your door. The colors will appear quite different outdoors than they do inside your home. Consider the other colors in your home and its surroundings. In our case, the natural greens in the plants surrounding the entryway served as inspiration, as well as the gray undertones in the flagstone accent and the home’s siding and roof. Weathered flagstone in the sidewalk has a natural, mossy patina that complemented the green colors in the most flattering way. It’s easier to achieve a professional-looking finish if you take the time to remove the locks and knobs.
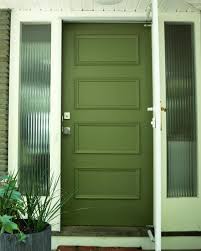
You can tape them off and paint around them, but it’s not the best approach. If you’re considering new hardware, now is the time to get it. Clean the door and use a palm sander to roughen the flat surfaces of existing paint (Image 1). This will help give the primer a better surface to adhere to. You may have to hand sand in the crevices and around the trim (Image 2). Wipe the entire door clean with a dry rag to remove dust (Image 3). Depending on the final color, you may want to get the primer tinted. By doing so, you’ll probably need fewer coats of paint. However, we used just white primer and two coats of green paint (about 1 quart of paint). When the primer has dried, run the sandpaper lightly over the surface to level out any irregularities in the primed finish. Use the rag to clean off the sanding dust. Begin by brushing inset or trim details by hand with a paintbrush so that you can lay an even base coat. Use the brush to feather out the edges of the paint so that there are no drips.
Use a small 6” roller with a low-nap texture (or a high-density foam roller) to apply a smooth, consistent paint application across all of the flat surfaces, including the edges of the door. Low-nap and foam rollers are ideal because they leave minimal stippling on the surface. But to achieve a really nice finish, use a paintbrush to lightly brush over the final coat of paint while it’s still wet to level out roller marks and leave a smooth “hand-painted” texture.
cheap home decor crafting with paper When the paint has had a full day to dry and cure, reattach the locks and knobs.
cheap homemade halloween decorations for outsideBe inspired, learn a bit & have a few laughs
christmas decorations on the door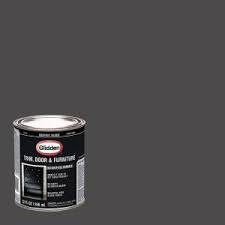
Well, I promised a how-to on painting doors, and I’m here tonight to tell you lucky ducks how it’s done. Hold on to your seats, this is probably the MOST exciting post you will ever read. I showed you my front door transformation here: I also painted the inside of that front door months ago, and I showed you that project here. I’ve painted a few doors in my day, and there’s a few things I’ve learned along the way. Hopefully this post will help you if you decide to do the same! OK, so the first thing you’ll want to do is test to see if your current paint is oil-based or latex paint. I’m not sure about interior doors, but I’d be willing to bet most exterior doors are oil-based. The thing is, you can paint oil over oil and latex over latex, but not latex over oil. But, I don’t do oil-based paint. I just don’t – latex is SO much easier to work with. Oil takes longer to dry – and that was the kicker. I didn’t want to take the door off the hinges and I knew I’d need to shut it (at least a few times) during the process.
Oil-based would make that harder to do. Not to slam oil paint though -- it is probably best for an outdoor surface. It holds up great! But I wanted to stick with my latex, so I needed to do a couple steps first. To make sure the door was painted in oil, like I thought, I used denatured alcohol: You’ll just need a bit – rub some on the door with a rag, and if the paint comes off, it’s latex. If it doesn’t, it’s oil-based paint. I knew once I tested it that ours was the latter. Because of that, I needed to prime with shellac-based primer: I use BIN for just about everything now – it is VERY thin and it goes on easily because of that. It’s stinky – so make sure to ventilate the area you’re working in. I love it because it dries CRAZY fast – so it is perfect for a door. And an impatient do-it-yourselfer. When it comes to doors, I have a plan of attack that works for me – it cuts down on brush marks: This is my method – I have no idea if this is the right method.

I start with the areas around the panels by using a good angled paint brush: The folks at Purdy sent me a set to use and I was in heaven. I used the 1.5 inch angled brush for the little insets in the door: Purdy brushes are the best – hands down. And I’m not saying that cause I got a set. I love them and use them all the time! The BIN primer is so thin, you don’t have to worry too much about brush strokes: I didn’t take the hardware off to paint the back of the door – I just taped around it and it worked out pretty well. I wish I would have taken if off, but that’s a whole other post. I finished up the door with the primer and let it dry: I use a small roller for the raised panels and the area around them. (Steps 2, 3 and 4 on the pic above.) I started the same process again with my black paint. I use Black Suede from Behr for all of my black paint projects and LOVE it: My friend Kate has mentioned to use Floetrol to cut down on brush strokes:

I used it about half way through, and it was weird -- I didn’t notice a difference at all: (One side had it, one didn’t – I’m pretty sure the left didn’t and the right did.) I added the exact amount it called for, but it didn’t help much, as far as I can tell. I will try it again though. It sounds like it (usually) helps tone down brush strokes quite a bit! Even with the tinted primer (I have my BIN tinted a tad), it still took a total of THREE coats to get it completely covered: But it was SO worth it. So worth it, in fact, that I am going to try out a few more black doors inside. When I did the front of the door, I made sure to clean it really well before starting: I just used my cleaning wipes, and then wiped it down with a damp towel after that. I also took off the hardware between coats: I left them off as long as possible after each coat, but you’ll see later why I had to keep putting them back on. I believe I took that hardware off about 15 times.

I used the same process with the primer as the inside, and if there were any brush marks, I just knocked them down a bit with some sanding between coats: Then…my lesson in reds started. I don’t know what lesson I learned, other than the one I already knew. Get a sample of your paint! Paint it on a poster board, then hang it on your front door. I started with a random match to a red that had the word “brick” in it – and it was not brick. It was more of a corally orange. I never knew what coral-orange was before, but this is it: The photos don’t do it justice. It looked like the entrance to a seafood restaurant. Because I got the paint at my local True Value, I got it mixed in an exterior Porter paint. And because I had a Porter paint nearby during this debacle, I went to them to see if they could adjust it: I found a Porter color that was more what I was thinking. The Porter guy was SO helpful and spent a good 20 minutes adding to it, (for FREE!), and he got it to the “new” red – a color called Brick Dust.
Brick Dust was more like Pink Sunset Dust: It was at this point that I was about to give up and live with a pink front door. These were just first coats, so they would have darkened and deepened with more coats – but I just knew they weren’t right. So I gave it one more try – this time I started from scratch. I checked out the Martha Stewart colors from Home Depot and found The One – Chocolate Cosmos:The brick red I was after from the start! I normally use small sponge rollers to paint doors and furniture: But for some reason the Behr paint I used for the exterior side (I had the Martha Stewart mixed in exterior Behr) was SUPER thick. I don’t know if it was because it was exterior or what, but it was acting all wonky. I ended up doing a final coat in a mini version of a regular 3/8 inch nap roller: That size works great for the panels on the door, and the thicker nap covered much better. I’ll be using that again for the future doors.The most exhilarating post yet.