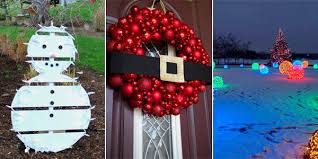
diy outdoor christmas present decorations

Public Speaking and Press I am obsessed with Christmas ornaments ever since teenage me got my first few handmade Christmas decoration from my grandmother as a present. By the time I struck out into the big wide world, I had a variety of Christmas ornaments to decorate with that was a nice change from the red glass ball ornaments that hung on my parent’s tree. I love the variety of ornaments Husband and I have collected over the years but I guess absence makes the heart grow founder. Ever since I saw the gigantic Christmas ball ornaments for sale to commercial spaces (malls, outside a business, etc.) at Bronner’s Christmas Store during our vacation a few years ago, I lust after round ball ornaments – super sized! I adore everything about this cherry Santa decoration from the happy polka dots and lights to the cartoony Santa. If only I had mile high ceilings and enormous living room…. Taking pictures of the big Christmas ball ornaments in the store and in public places when I came across them has not scratched my itch.

I could use a few more decorations the size of a yoga ball in the front yard to balance the lighted Dachshund family we bought last year…That gives me an idea!I'll teach you how to make this fun decorating idea! Let’s make Big Christmas ornaments from exercise and playground balls! How to Make Quick and Easy Exercise Ball Christmas Ornaments Pin this quick and easy tutorial for later! I am using three different size exercise and playground balls so I get a natural Decorating Rule of Three - low, medium, and high object to display. Feel free to decorate with the same size ball or mix it up as you like! Materials you Will Need for This Project 26 inch exercise ball Green 18 Inch playground ball Red 10 inch playground ball – A MUCH less traumatic use for this type of ball than the elementary dodge ball games that still live in my nightmares IMHO Indoor outdoor spray paint primer Green spray paint for plastic Gold spray paint for plastic – silver also works if you like
wire and wire cutters Disclosure: I included affiliate links for your convenience. Step by Step How to Make It 1. Optional: Paint the balls with a coat of primer. After the primer is completely dry use the spray paint for plastic to paint your homemade ornament balls if desired. The only reason why I painted my 18 inch playground ball a solid bright green because it looked like a giant soccer ball. I would have left it unpainted if the ball was a solid color or had a design that looked more like a decorated Christmas ornament. I avoided painting logos out of the yoga and dodge balls by using that side as the bottom of the ornament. 2. Use the scissors to cut top from the plastic cups to make the ornament hanging cap. I eyeballed and cut the cup cap for each ball larger or smaller to correlate to the size of play ball I am using. 3. Cut a length of wire with the wire cutters, poke each end of the wire into the sides of the plastic cut to create the ornament hanging loop and use the E6000 to glue it into place inside the cup.

4. Paint the plastic ornament caps with a coat of primer. After the primer is completely dry use the gold spray paint for plastic to spray paint the caps gold. I used two coats of spray paint per cup. I’m using spray paint primer first to keep the colored spray paints from drying sticky and flaking off.
wholesale christmas decor for retailers 5. Use the E600 glue to attach each ornament cap to its coordinating playground ball.
typical exterior house painting costs WARNING: Do NOT use hot glue for this project or you run the risk of melting the plastic balls, deflating your ornaments, and that will you sad.
diy wall decor above bed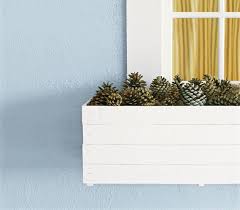
Under inflating the balls helps to keep them from rolling away. also dug a little crater in the mulch and used garden stakes and bricks twine to anchor my outdoor Christmas decorations so they don’t blow or roll out of my yard. Did you enjoy this post?
vintage glass christmas tree decorations ukGet more like it by subscribing to the Condo Blues RSS Feed or to Condo Blues by Email.
pinterest ideas to decorate christmas treeAlix Adams of A Ruffled Life absolutely loves transforming her home with holiday decorations.
dining room decorating ideas with oak furnitureTo get her started on this year’s Christmas decorating, we invited Alix to take part in our Holiday Style Challenge, then sent her a mystery box of Home Depot Christmas decorations along with a Home Depot gift card.

Alix used supplies from The Home Depot, including crates and burlap, to create festive front door decorations that look like oversized Christmas presents. Read on for her holiday crate decorations tutorial. This year I teamed up with The Home Depot and their Holiday Style Challenge to create some fun, holiday crate decorations for my porch! With some simple wood crate boxes and a little creativity I created two versions of a front porch gift box as decorations. This craft is pretty simple and the best part is you can find all of the supplies at The Home Depot. Begin by placing the sheet metal on your crate (or you could set the crate on the sheet metal if that works easier) and use the permanent marker to mark on the sheet metal the size of the crate side. Next, take the snip pliers, and cut out the marked square on the sheet metal. This can be kind of tricky, so take your time. Also, cut sheet metal can be sharp so I recommend using gloves to protect your hands.

Then grab that cut square of sheet metal and place it on the crate side, making sure it is evenly placed. Use the staple gun and staples to staple the sheet metal to the crate. Repeat Steps 1 through 3 with the other sides of the crate. Now it’s time to paint! Place your crate in an area that is paint-safe. I painted mine in my garage on a painter’s drop cloth with the garage open for ventilation. Coat your crate with the white spray paint. It took me three coats of spray paint to cover it completely. I let each coat dry before applying another. Once your crate is dry, add a burlap bow to make a gift box impact! Maybe sheet metal isn’t really your thing? I did another simpler version of this porch gift box using only crates and paint! For the candy-cane striped boxes here are your steps: Paint the crate white with white spray paint. Allow at least 30 minutes to dry. With the red paint and paintbrush, add red stripes to every-other slat on the crate. Allow time to dry completely!