diy home decor crafts

With that said, you’ll want to start collecting (or hoarding) toilet paper rolls after you see these incredible DIY toilet paper rolls crafts. Cardboard and toilet paper roll tree. Toilet paper roll organizers and more… # # # # # # # # # Enter a search term (optional) Dolls & Teddy Bears Select as many as you like (optional) Longer than a weekend A week or two A month or more Home > Decorating Ideas Find hundreds of free craft projects for home decor and free decorative crafts, like clever ideas for DIY home decor. Decorate your house for less with home decor craft projects like bedroom decor craft projects, bathroom decor craft projects, center Print My Entire List < 1 2 3 4 > Upcycled Flea Market Glass Vases 20 Retro Vintage Crafts No Sew Fabric Flower Bouquet Coffee Colored Vintage Clothespins Grandma's Favorite Vintage Plaques 40+ Fabulous Decoupage Ideas Toilet Paper Roll Sunflowers

Vintage Plate DIY Cake Stand Effortless Glass Jar Vase Discover crafting projects, free patterns, tips and special offers. Get free craft projects, how-to crafting tutorials & product reviews. Thanks for signing up Sorry, we could not sign you up. Drop Cloth DIY Rug From Baking Pan to Wall Decor "Quick and Easy Decoupage" eBook from Plaid "Welcome to Our Home: Knit and Crochet Ideas from Red Heart" free eBook
cheap home decor crafting with paper Simple Paper Clip Florals DIY Recycled Crafts
decorating a christmas tree order Create a Butterfly Haven
christmas tree decorations for runners My Craft Projects (0) View »
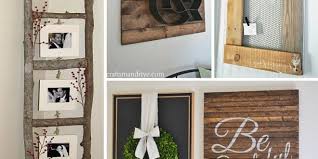
Register now for FREE to: SAVE all your favorite craftsADD personal notesQUICKLY reference your crafts Join Us TodayForgot Password 11 Crochet Shawl Patterns: Crochet Poncho Patterns, Free Easy Crochet Patterns and More 12 Knitted Scarf Patterns: Fabulous Free Knitting Patterns for Beginners 14 Free Crochet Patterns for Babies and Toddlers 16 Free Crochet Hat Patterns, Scarves, and Gloves 22 Free Crochet Patterns: Afghan Patterns, Crochet Hats, and More 24 Quick and Easy Knitting Patterns 7 Adult Coloring Pages 8 Free Apron Sewing Patterns Easy Lace Knitting Patterns Quick & Easy Decoupage: 12 Fabulous Mod Podge Projects for Your Home Our Newest Projects & Articles Springtime Cat Coloring Page 81+ Printable Flower Patterns Rustic Coffee Filter Wreath FloraCraft at the CHA 2017 Creativation Show Leisure Arts at the CHA 2017 Creativation Show Testors at the CHA 2017 Creativation Show 11 DIY Craft Projects for Any Occasion
Tonic Studios at the CHA 2017 Creativation ShowRustic DIY home decor has been around a lot longer than Chip and Joanna. I know it’s hard to believe, but we were distressing furniture pieces and eating off farm tables back in the 80’s at my house. Sure there are some things I’d love to forget, like the smokey blue and dusty mauve and let’s not forget about duck wallpaper. What can I say, I may of had all that too!Luckily today I’m sharing some current, DIY home decor ideas from my blogger friends that you can do! Take a cheap jack-o'-lantern candy bucket and cut off the handles, and cut down the back and to remove the round bottom. Then stretch the jack-o’-lantern over your sconce and secure in the back with tape, as these will stretch out a bit and fall off. At night, your sconces will glow with fun, ghoulish fun. Then stretch the jack-o’-lantern over your sconce and secure in the back with tape, as ... more Add a pop of color and design to an oft-neglected part of your home design: the stair risers.

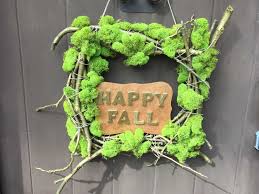
Tempaper makes peel-and-stick, removable wallpaper in several fun designs, ranging from $12.99 for a single stripe to $98 to $125 for a roll of paper. Tempaper makes peel-and-stick, removable wallpaper in several fun designs, ranging from $12.99 for a single stripe ... more The materials for the wood slices wreath. *Several wood rounds, or slices, in a variety of sizes. , but I made my own *Various colors or craft or acrylic paint *Foam brushes *Styrofoam wreath form *Burlap trim *Hot glue gun less, but I made my own *Various colors or craft or ... more The materials for the moss and twigs wreath. *Twigs and small branches *Gold spray paint *Flat wood square that fits inside the wreath form *Wood letters or numbers *Craft or acrylic paint *Foam brushes *Square wire wreath form *Twine *1 bag of Quality Growers Preserved Reindeer Moss less*Twigs and small branches *Gold spray paint *Flat wood square that fits inside the wreath form *Wood letters or numbers *Craft or acrylic paint *Foam brushes *Square ... more

Reader Lou Williams shared this photo of last year’s Thanksgiving Day table, “featuring dried tiny pumpkins, dried artichokes, orange candles, leaves from my yard, a wood carved turkey, a copper pitcher and roses and mixed greenery from H-E-B." less Reader Lou Williams shared this photo of last year’s Thanksgiving Day table, “featuring dried tiny pumpkins, dried artichokes, orange candles, leaves from my yard, a wood carved turkey, a copper pitcher and ... more Well, my fingers are sore and my lower back is tight. That means I got all crafty, and I can’t wait to share these DIY projects with you. I’ll go in order of least to most difficult. This is super easy, but does require some hand strength. 2 cheap, plastic jack-o’-lantern candy buckets Instructions: With very sharp scissors, cut off the plastic handle from the buckets. Then, cut lengthwise down the backside of the pumpkin until you reach the bottom. Cut out the circular bottom. Stretch the jack-o’-lantern over your sconce and secure in the back with tape, as these will stretch out a bit and fall off.
At night, your sconces will glow with fun, ghoulish fun. Man freed early from life sentence by Obama back in jail Pat Green's bar, restaurant & venue 'The Rustic' opening in... Spurs’ Popovich on race: “If you were born white, you... I was given just sample swatches to try, so I centered them on the risers in my home. It’s such a fun look, I would love to do more. And when I tested removing the paper, it peeled off easily, leaving no adhesive behind. Just cut and stick, and you’re good to go. Several wood rounds, or slices, in a variety of sizes. , but I made my own with a miter saw cutting off slices from a large downed magnolia tree branch from my yard. (My boyfriend had to teach me to use it, and I only almost broke it, like, three times, so basically I’m now a pro, right?) Various colors or craft or acrylic paint Instructions: Start by selecting the colors you would like to paint your wood rounds. I chose a metallic theme in bronze and shades of gold.

With a foam brush, apply the paint to one side of the rounds. I left the outermost, darkest ring free of paint to keep the rounds looking like wood instead of painted circles. While the rounds dry, wrap your wreath frame in burlap trim, using an extra length to form a tie from which to hang the wreath. Secure it with pins and dabs of hot glue at the seams. With hot glue, apply the rounds in various layers to get the pattern that looks best to you. Note: If you are making your own rounds, don’t discount branches with scarring and wood rot. The imperfections actually looked the coolest, forming amazing shapes and patterns once cut. Warning: You will burn your fingers with hot glue while making this. Mine are rather Tefloned from years of hot glue and hot pans, and even I hurt myself. Flat wood square that fits inside the wreath form Square wire wreath form 1 bag of Quality Growers Preserved Reindeer Moss Instructions: Roughly spray paint the twigs gold.
I wanted just a hint of the gold, so I applied just one fast layer to each side without worrying about total coverage. With the craft paint, paint the wood sign and the letters or numbers the colors of your choice. Choose letters for a short message or your house number. (You also can spray paint these if it’s easier, but I wanted color contrast, and since I only had gold spray paint on hand, I used acrylic paint.) Once everything is dry, layer the twigs on the wreath frame. Don’t worry if you can see the frame through. Wrap it into place with twine (secure the bottom layers with hot glue to make it easier) and use a length of the twine to form a hanger for the wreath. Hot glue the letters or numbers on the sign, and glue that to the bottom of the wreath frame, tucked behind the branches. You will have to pick a side to glue it to, as gluing just to the bottom will not provide enough support. Now comes the potentially painful part: Hot glue balls of the moss to the twigs, covering the wire frame.

Moss is pretty fragile and porous, and there is no way your fingers will not come in contact with the glue. Wear thin gloves for protection if needed. Last week, I wrote about three different fall tablescapes. Lou Williams shared this photo of last year’s Thanksgiving Day table, “featuring dried tiny pumpkins, dried artichokes, orange candles, leaves from my yard, a wood carved turkey, a copper pitcher and roses and mixed greenery from H-E-B. “I keep the various dried pieces and assorted other items from the previous year and add new or repurpose. My favorite thing is using “found” items from my yard — old branches, even weeds, which are interesting when dried or painted, and combining them with other items.” Your table is gorgeous, Lou. Thank you so much for sharing. Readers, what fall decorations or crafts are you working on this year, or do you have a favorite from past years? Please email me the details along with a photo and your daytime contact number, and you could be in my column.