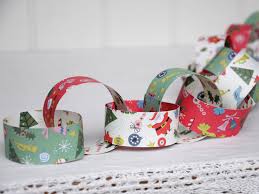
diy christmas decorations out of paper

Share with your friendsFun DIY Christmas Decorations: Upcycled Penguins and Snowman DIY Christmas decorations recycling cardboard: With all the online Christmas shopping arriving at my house I have my very own cardboard mountain. Most of it I stick in the recycling, but I do keep some back for crafting. My popular fabric birdhouses are made with cardboard. Wednesday night was craft night in my house and after a few sloe gins my friend Wendy and I, attacked my cardboard mountain by making some fun DIY Christmas decorations with it. We made are very own Penguin family and snowman out of the cardboard. You may think that this would be a great craft for the kids to make in the holidays. I’m sure it is, but as 2 grown ups we really had fun making our own little penguin family. Plus it cost us almost nothing to make. As more and more amazon parcels keep arriving the cardboard mountain keeps on growing, so no doubt we will be making some more DIY Christmas decorations next week.

Enlarge or reduce the size of the template, depending on whether you are making a mummy, daddy or baby penguin. Cut out your penguin shapes and cut the slits into the cardboard so the 2 pieces slot together. Paint your cardboard penguins. I painted the adult penguins black and white and the baby penguin grey and white.
home decor trends 2014 ukRemember to paint the back of the penguins a solid colour and the front tummies white.
decorations for christmas cake When the paint is dry slot your penguins together. Other DIY Christmas Decorations We had so much fun making the penguin family we decided to make them a snowman. I think next week we will attempt to make our penguin family an igloo. These penguins would make a great decoration for any Christmas or New Year Party.
If you are looking for more upcycled winter craft ideas visit allfreeholidaycrafts for some great ideas. If you are any good with a jigsaw then these penguins would be fun to make with plywood for a more lasting Christmas decoration. However that won’t help with your cardboard mountain. Share with your friendsThe holidays are just around the corner, which means that it’s time to start thinking about decorating the tree if you celebrate Christmas. And although it’s fun to go out shopping for ornaments, it can become quite pricey – so why not make your own unique decorations? Here are 25 of our very favorite Christmas ornament tutorials to get you started. These DIY Sharpie ornaments couldn’t be easier to make, and they’re really quite elegant. All you’ll need are a few glass ornaments (which should be available at almost any craft store) and a gold Sharpie. Jenna Burger will show you the rest here. You could try other Sharpie colors too, if you’re not partial to gold.

This project uses round glass ornaments as well, but with a much different effect. This time the ball is dipped into gold paint and then an air plant is slipped inside. Air plants are very trendy these days, so your friends are sure to ooh and ahh over this one. Head over to Feminine Modern to find out how to make your own. These beautiful ornaments don’t look like they’re made of salt dough, thanks in part to their unique stamping treatment. And you don’t have to stick with the round shape, you could experiment with different cookie cutters as well. Head over to Living Your Creative to check out the step-by-step instructions. This beauty has the appearance of being burned, but the design is actually done using a transfer technique that involves an ink jet printer. Head over to Mountain Modern Life to check out the tutorial (there’s a link to the “burning” tutorial, too). This is a great way to add some rustic charm to your Christmas Tree. These feather ornaments are dipped in various shimmering things like glitter and rock salt, and there’s also some silver leaf involved.

The one on the left is made of birch bark, and the one on the right is a real feather. Head over to Anthropology’s blog to find out how to recreate these ornaments yourself. These ornaments are lovely on their own, but they’re even more fantastic for those of us who love Kate Spade! The patterns are created by taping off certain areas and then spraying with gold glitter spray paint. And the addition of the black and white striped ribbons are just perfect. Check out the tutorial at Hi Sugarplum. This whimsical little ornament is made from layers upon layers of felt squares… it’s really quite genius! All you’ll need is felt, glue and some string to make a loop for hanging. Head over to This Heart of Mine Blog to find out how to make one of these yourself. You could customize it any way you like, too. These stunning snowflake shaped ornaments looked like they have been quilled, but they are actually made with strips of old book pages, hot glue and some glitter at the end.

They’re easier to make than the look. Make your way over to Tifani Lyn’s blog to find out how to make these yourself. These ornaments look quite lovely together and are incredibly easy to make. The combination of black, white, gray and gold along with red ribbons makes for a modern yet festive display. Check out the full tutorial over at the Suburble blog. And do make sure to use multi-surface paint! Not only is this one easy to make, it also consists of things that you might actually already have at home. Go grab a pinecone outside, and use whatever ribbon and twine you have on hand. Head over to Make It – Love It to find out exactly how to assemble this lovely pinecone ornament. These adorable little ornaments are made of plain old plastic figurines which are spray painted gold for a completely different look. And the blue felt is a nice touch, a welcome departure from the typical ribbon that is used to hang most ornaments. Check out the full tutorial over at the City Farmhouse blog.
This miniature wreath ornament is a good alternative for those of you who prefer a more muted, rustic sort of theme. All you’ll need for this one is some hemp string, colored felt and some red and white ribbon. Make your way over to Love Create Celebrate to find out all the details about this lovely little piece. For those of you who prefer a more colorful Christmas tree, give these beautifully painted paper maché ornaments a try. You’ll need pre-made paper maché ornaments, paint and a brush. How simple is that?! Make your way over to the Oh Happy Day blog to find out all the details and to see more photos. This gorgeous snowflake ornament is sure to please anybody who enjoys a country-style Christmas. And the good news about this project is that you may already have all of the materials you need – twigs, evergreen sprigs, buttons, glitter and twine. Check out the full photo tutorial over at Little Things Bring Smiles. This stunning acorn shaped ornament looks more complicated than it actually is… all you’ll need is a styrofoam egg, large sequins and sewing pins.

The beautiful acorn shape is a pleasant departure from the typical round ornaments that you see everywhere. Check out the full tutorial over at the Skunkboy blog. Although this is not your traditional sort of holiday ornament, it’s really quite beautiful in a unique way. The shape feels a bit mid-century modern, while the material (book pages) lends a rustic sort of sensibility. Make your way over to A Creative Dreamer to find out exactly how to recreate this spiked beauty. If understated and simple is more your style, these round wooden ornaments might be perfect for you. They are dipped in copper and white paint for a subtle touch of glamour, and hung using small hook and eye screws. Head over to Tara Victoria’s blog to find out exactly how to make a few of these pretty balls. For a touch of whimsy, give these cute walnut reindeer a try. You’ll need whole walnuts, brown felt, mini pom poms, ribbon and glue, and the assembly is easy. Check out the tutorial over at Red Ted Art.

And if you’re really feeling motivated, make a whole group of them – Rudolph, Donner, Blitzen…. Believe it or not, this diamond shaped ornament is actually made from scratch using balsa wood glued to paper to form the lovely diamond shape. Find out how over at A Beautiful Mess, where they give instructions and even provide a template. It may take some extra time, but it will surely be worth the effort! These adorable “gingerbread” men are actually made out of cinnamon salt dough, but it doesn’t really matter since you’ll be hanging them on your tree rather than eating them. They look so darn cute with those checkered scarves, don’t they?! Check out the tutorial over at Where Your Treasure Is. These unique geometric ornaments are made in the style of a himmeli, a traditional Finnish ornament made of straw. These are made using actual paper straws, a fun play on the popular striped straw trend. Make your way over to Nalle’s House to find out exactly how to recreate these stunners.

Quilling, a technique that involves wrapping strips of paper around a stick, makes for the perfect Christmas ornament with its intricate details and gorgeous spirals and curves. Head over to Reese Dixon’s blog to find out how to quill, and also to check out the tutorial for this specific project. These cement stars are a tad bit modern, and also whimsical at the same time. And the lovely paint dipped look adds a certain appeal to them as well. And because they’re so small, they won’t weigh your tree down like larger cement ornaments would. Check out the full tutorial over at Yeobo. Although these ornament look complicated, they are actually quite easy to make. All you’ll need is a bunch of white paper, scissors and some string. Make your way over to the Design and Form blog to find out exactly how to cut the paper pieces so they form these stunning rounded shapes. Origami is another technique that lends itself to Christmas ornaments, thanks to the ornate shapes you can create and the lightness of the paper.