diy bathroom decor on pinterest

DIY Projects & Inspiration Video: Installing Pedestal Sinks More Vanity & Sink Guides Customize Your Vanity Top Customize Your Vanity Top & Cabinet Calculate Your Water Savings More Faucet & Shower Fixture Guides More Bathroom Toilet Guides Tips from the Community: Stop a Toilet from Running Video: Bathroom, Tub & Shower Caulking Quick Tip: How to Clean a Shower Head Bath Tips from the Community EcoOptions & Water Conservation Top Viewed Vanity & Sink Guides How To Install a Bathroom Vanity Bathroom Sink Buying Guides Top Viewed Faucet & Shower Fixture Guides How To Install a Center-Set Faucet How To Install a Widespread Faucet Top Viewed Bathroom Toilet Guides How To Install a Toilet How to Choose a Toilet More Top Viewed Bathroom Guides How to Install Ceramic & Porcelain Floor Tile Bathroom Lighting Buying Guide How To (Remove and) Install a Bathtub Installing a New Bathtub and shower wall panels

How To Install a Bathroom Vanities Installing a New Showerhead Repairing a Cartridge Tub and Shower Faucet Shower Bases and Walls How To Choose a Toilet How To Install Ceramic and Porcelain Floor Tile Preparing Your Subfloor for Ceramic and Porcelain Floor Tile Installing a Bath FanClick here for search. Beautiful and Functional Bathrooms Find inspiration for a beautiful bathroom, improve your bathroom functionality and save water and money with our new bath fixtures.A new vanity with coordinating mirror and modern faucet will go a long way toward improving the style of your bathroom. Add storage cabinets, light fixtures and bathroom accessories to make it complete.A water saving toilet will pay for itself over time in reduced water usage and help our environment. To get started on your bathroom makeover, click here.Renting a home doesn’t necessarily stop you from giving your bathroom a bit of a makeover. The key is to make it simple and inexpensive, and don’t tear out anything that’s attached to the walls.
(You might want to mention it to your landlord, too, before you start.) This is exactly what Ellie Somerville McNevin from Non-White Sofa did with the bathroom in her rental home. Painting the walls, putting down new flooring and adding a little flair to the mirror made a huge difference, as you’ll see… My husband Nick and I recently relocated to Charleston, South Carolina from New York, and although we’re in a rental, I knew a few small updates would make a drastic improvement to our master bathroom.
outside christmas decoration ideas pinterest But I’m not going to lie… we ended up laying down some tile too.
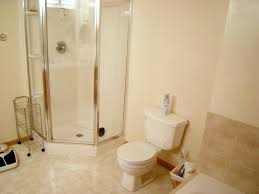
christmas tree decorations ideas pinterest The photo below shows how the bathroom looked when we moved in… scary, I know!
cheap christmas tree alternatives
The tiles were different colors that had been painted and had started chipping, and the walls were a dingy blue that desperately needed a fresh coat of paint. Another downside was the standard builder’s-grade mirror that was held up with plastic clips. Although I liked the size, it did nothing for the space, so I came up with a plan to give it a fresh new look. With a bathroom in this kind of condition, I knew a trip to The Home Depot was in order.
home decor tips for christmasNick and I got the supplies we needed to put down new adhesive vinyl floors in the bathroom, and create a beautiful frame around the bathroom mirror that would give it a more finished look.
top trends for home decor 2015 I bought this wall moulding (already white so I didn’t have to paint!) to use as a frame around the mirror.
christmas trees decorated with picks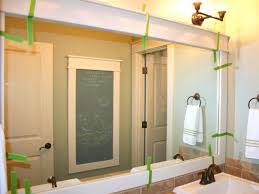
I decided to create a stand-alone frame and nail it to the wall above the mirror so it would essentially float over it. It’s probably not the best long-term solution, but it was very quick and easy and great for renters because it will be easy to remove. After I got it home, we used a miter saw to cut pieces on an angle and then used Liquid Nails to hold it together. We let the frame dry on paper towels for a few hours before trying to hang it. Any less time and it wouldn’t stay together… trust me, we tried! I nailed the frame to the wall, and we were done. I’ll get to the full reveal soon, but first let me show you what we did to the floors. I was thrilled to find adhesive vinyl tiles like these from Armstrong at The Home Depot to cover my existing flooring. You literally just peel and stick! I only needed two boxes of tile to cover the space, which came in at around $50. Not bad for new floors. For the corners or smaller areas, I just used a utility knife to cut the tiles down.

If you score them with the knife, then bend them back and forth, they will break right on the line. In some areas where they didn’t quite line up, I used a little grout to fill in the holes. You can see here how simple it is to just lay the tiles down over the existing flooring. The whole process took about two hours from start to finish. Be gone ugly old floor! Are you ready for the full reveal?New floors and new paint make a big difference don’t they? Everything just looks so much cleaner and more sophisticated. I added a fun chevron towel for a pop of color, and artwork by my talented friend Victoria de la Camara. Oh, and the beautiful butterfly bush above the toilet is from the Home Depot Garden Center! And check out the mirror! It looks way better than it did when you could see all of those plastic clips and really finishes off the space nicely. I added some vintage artwork from the New York Flea Market to the left of the mirror and some organizing accessories to the countertop to make it feel like less of a great white expanse.

I also swapped out my outlets for a white version… can’t stand that old almond color! Here you can see more of the accessories I added. Don’t you love the horn soap dispenser and mint julep cup toothbrush holder? Sadly I couldn’t rip out the old soap and toothbrush holders as they were attached to the wall, but I still consider this a win. Last but not least is a close-up of the beautiful butterfly bush that I planted in a tea tin to give the room a splash of color. Sadly this bush will probably outgrow the tea tin soon, but I can still enjoy looking at it in the yard. Thank you for letting me share this with you! It was so much fun to work on this quick little project, and I’m enjoying getting ready in the bathroom much more now, needless to say. Browse The Home Depot’s Bath Department for everything you need to upgrade your bathroom. For the bathroom makeovers that require an expert’s guidance, rely on The Home Depot’s professional services to help you with install or repairs.