christmas coffee table decoration ideas

Christmas Coffee Table Setting by The Folks At Craftideas.Info There is nothing like sitting down at the table with good friends over a cup of hot coffee or tea during the holiday season. A decked table in the colors of red and white looks inviting and comforting and will keep your guests relaxed for hours to discuss all of their upcoming holiday events and plans. After setting the table with red place mats and a white porcellan coffee service, simple and easy decorations were necessary to give it that special Christmas feel.The embellished glass candle holders with the starry design were created by simply adhering Christmas felt ribbon around the glass using a clear non-permanent double-sided adhesive. The advantage is that the ribbon can be removed after the holidays so that you may use the candle holders for other occasions. Then the larger candle holders were filled with fine red rocks and a white candle and the smaller ones with only a tealight.Ribbon garnished candy canes are placed in each plate to adorn them.
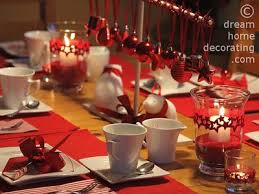
A double-looped ribbon bow was first created and tied off with a thin piece of satin ribbon. Then a glass bauble was added to the ribbon and then tied off around the candy cane. The centerpiece stand was purchased at the popular Swedish furniture store and embellished with red garland and ornaments. A ribbon bow was tied to the bottom of the stand and two polar bears with red scarves finish off the decoration.All in all the table is quickly set up once you have the supplies and can be easily repeated in the following years.Renate's comment: Wow, who wouldn't want to sit down at this coffee table! Gorgeous table decorating ideas - you've created an effortlessly beautiful, polished Christmas look that can be copied on a very low budget! Thank you very much for sharing it with us! (Note: This entry was 1st runner-up in our Christmas Table Settings Contest 2012! For more great crafting, visit craftideas.info - a lovely site, full of super inspiring craft instructions. › › Christmas Coffee Table Setting

I keep this private.One of my favorite ways to dress my home for the holidays is to add in fresh greenery wherever I can. Of course that means putting up a Christmas tree, hanging wreaths wherever possible, and planting paperwhite bulbs that bloom throughout December. For something fresh this year, I decided to create a snowy tableau on my coffee table using a wreath, faux snow, and candles. If you don’t want to dress up your coffee table, this would make a lovely Christmas centerpiece for a dining room table, kitchen island, or even a console table! To begin, flock your wreath. For this project, the wreath will be lying flat on your table, so you’ll want to spray the flocking straight down. This way the heaviest coat of ‘snow’ will be on the parts of the needles that face straight up, creating the most realistic ‘snowy’ look. Using this method, the bottom needles will be mostly snow free, as you can tell in the first image above. (Stylist extraordinaire Liz Demos walks you through creating a realistic, snowy effect with flock spray in this video for design*sponge– starting at about 3:25).
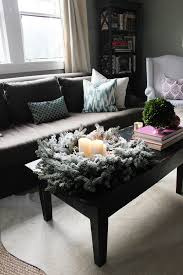
You could also cut a circle out of a piece of cardboard so that it fits right underneath your wreath. Next, group together a few white or ivory pillar candles in the center of your tray.
exterior house paints photosYou can also use Flameless LED pillar candles if you have little ones around your home.
exterior colors for small homesA collection of candles of different heights works best. Also, remember to use odd numbers — either 3 or 5 create a the most aesthetically-pleasing arrangement. Place your wreath over your tray, so that the edges of the tray can’t be seen. The next step is to add icy, crystallized picks to your wreath (usually available at a local craft store). This step is optional, but it does add extra texture and dimension to your arrangement. Before sliding the picks into your wreath, bend the pick so that all of the branches move in the same direction.
You’ll want the motion of the picks to match the motion of the wreath. Insert the picks into your wreath so that the shape of the crystallized branches matches the shape of the fir sprigs. Work your way around the wreath until you’ve inserted all of the picks. You’re almost ready to start adding the faux snow, but first add in the rest of your LED votive candles. I like to have a mix of tall and short candles, and I do love the soft yellow glow of the LED votives, but you can use any collection of candles you have around the house, even tall tapered candles! You’re now ready to start adding in your instant snow. Using a spoon, start dumping the snow between the candles and around your candles. You want the snow to pile up in the center so that it creates a more realistic effect, rather than sprinkling an even coating throughout. After you light your candles, your arrangement is done!There are so many reasons to celebrate around a year. Special occasions need special arrangements.

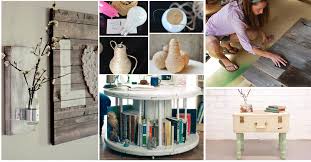
Why don’t you get innovative with these DIY Rustic Home Decor Ideas this season? These are great and are easy to make using simple household tools that provides an artistic and rustic appearance to your rooms. Materials: Vintage suitcase, 4 Table legs, 8 Flat washers + 4 Wing nuts, Power drill, Paint + Paint brush, Measuring tool (yard stick, measuring tape, etc.) See directions and the tutorial: here These Pallet Coffee Tables are easy to make and are innovative at the same time. You will only need two pallets and some scarps of wood. You can sand the pallets to make them look new and glossy. 9 inch wood would form excellent legs and after completion, this table would add a new essence to your room. See the full tutorial: here These racks are an innovative way to stack knives in your kitchen. Sand a plank of wood of desired length and carve out some holes on the back of the plank. Now attach some round ceramic magnets with glue that fits just right to the holes.

Once finished, you can attach it on the desired wall and you innovative knife rack is ready to use. These are simple racks that are innovative and attracting. You can make yourself one with some sanded planks of wood. You can even carve out the lower end to stack wine glasses. These racks are on the most famous DIY rustic home decor ideas. These are fantastic as wall decors and often catch the attention of others. It can be stated as a beautiful and functional wall décor. A wood plank is needed to make this amazing décor. All you need to do is select the wall to put it on and decide how much above the ground you want to fix it. Once done, you can start marking it with the help of a yard stick and pencil or marker. What an excellent idea it is! This looks great on the walls. These look rustic but stunning with flowers in it. The sanded wood complements any wall perfectly and provides your walls with an artistic appearance. More importantly, you can craft one of these at home, all by yourself.