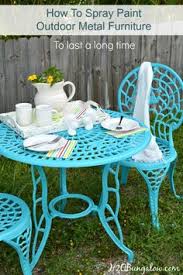
best way to spray paint metal chairs

As you may have read in this blog, I am in the process of a garden redesign at my Lily Pond Lane home in East Hampton, New York. All of the hundreds of rose bushes that were dug up in the spring and transplanted at my farm in Bedford are doing quite nicely in their new environment. I’m also having great fun rethinking and replanting all of the Lily Pond garden beds. Part of this new design included changing the color of my many pieces of outdoor metal furniture. I decided to transport all the furniture to the farm and have some of my crew work on this rather large project. The new paint color, called Carton, is from the Martha Stewart Living Paint line available at The Home Depot. Bedford, East Hampton, Employees, Gardens, My Farm, My Home, Photo GalleryEdit ArticleHow to Spray Paint Metal Spray paint is inexpensive and convenient to purchase from nearly any discount, home improvement or hardware store, and it is a versatile solution for many projects, including metal surfaces.
Spray paint provides a smooth, even finish on metal surfaces and dries quickly. Use these tips to spray paint metal. Be sure you buy a brand of spray paint that was intended for use with metal. Remove any rust or loose paint from the metal surface. Sand the metal surface with a medium-grit sandpaper or use a wire brush to rid the surface of rust or loose paint that would create an uneven painting surface. Clean the surface of the metal object you want to paint. Remove dust or other particles with a moist rag. Clean the surface with mineral spirits to remove dirt and other grime. Prepare your painting area. Select an area that is well-ventilated. Spray paint fumes aren't typically harmful, but ventilation is necessary to provide the painter with fresh air. Position a drop cloth, cardboard, wood pieces or garbage bag to catch any loose particles that fly off while you paint.Humidity can affect how your paint dries and adheres. Choose locations and times of day that are less humid.
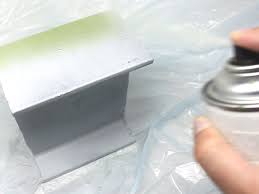
Check to make sure the nozzle is clear. Get used to how the paint flows from your nozzle as you do your test painting. Spray paint onto your metal surface. Hold the can approximately 10 to 12 inches (25.4 to 30.5 cm) away from the metal surface.
cheap diy christmas party decorationsGetting too close to the surface can cause drips and runs. Painting too far from your surface causes uneven spraying. Paint with a sweeping motion. The sweeping motion should be from top to bottom or side to side. Overlap your passes with the spray paint. Pause after each sweeping motion by letting go of the trigger. Apply thin coats of paint to avoid drips and runs. Thicker applications dry more slowly than thinner coats, and do not dry as evenly. Allow your painted surface to dry for at least 3 hours. Spray on a second coat of paint. Most spray paint projects require no more than 2 coats to evenly distribute paint and cover a metal surface.

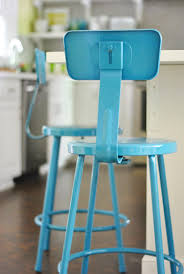
Allow the second coat of paint to dry before handling the object. Wear gloves to reduce the amount of paint you get on your hands and under your fingernails.I kind of have been holding out on you guys. I wanted to test this project a few times before I told you how life changing it was. It IS life changing and now you are in on the secret! Painting furniture has long been one of my favorite pastimes. It is always amazing to me how a little love can totally change a piece from horrifying to awe inspiring. My go to technique has always been spray painting because every time I tried to paint with normal paint it was a HORRIBLE experience. Now, I know that there are people that swear by good brushes, foam rollers, and Floetrol and I am sure that they work for some…but I have never been able to master the paint from a can technique…until now. First lets chat about the 3 most common problems when it comes to painting.Also the acronym for brush strokes is BS. Just putting that out there.

Brush strokes happen when your paint dries before it has a chance to level. The stiffer (I am just going to say it, and crappier) your brush the worse it is going to look. Chip brushes are literally your worst nightmare when painting furniture. But even with expensive brushes I have never been able to paint something brush stroke free.Flashing is unevenness in a paint finish sheen. It happens for a few reasons. If you are using cheap paint, especially cheap paint that has a high sheen, trying to get too much paint out of a roller, not leaving a wet edge, and rolling all willy nilly. Flashing is extremely noticeable when light reflects off of a piece. White foam rollers are like a shifty teenager in a trench coat on the sidelines of the homecoming football game. They are perfectly poised to ruin your crowning moment. Also foam rollers=light texture. Not enough to start over but FOR SURE enough to make you want to kick the dresser every time you walk by it. 3. Stickiness After Drying.
Have you guys ever been in contact with a piece of furniture that never fully cured? It is eternally sticky to the touch. This happened once to a piece that was in my Mother In Law’s house. It was a four poster bed that was painted high gloss black and it was unusable because it was so sticky. This can happen for a few reasons, your paint could be crappy quality, there wasn’t adequate dry time between layers. It seems like the higher the sheen, the more you risk this being a factor. Plain and simple, latex wall paint is not ideal for furniture. So do you want to know what the secret combo is for a perfect paint job? Sherwin Williams Pro Classic and a Mohair Roller. I kid you not, you will never go back once you have tried this combo. Start by prepping you piece with a light sanding and a good cleaning. (By light sanding i mean the way you would wipe down a wall) This is the most important part so listen and listen good. Roll it on with only a few passes, I am talking 3.