best way to paint a wood front door

Your entrance is the first thing people see when they come by, so why not make your home stand out from the rest? Although painting your entire exterior would be a big to-do, giving just your door a new look is a doable DIY -- and it packs a lot of punch. We've chosen six paint colors for front doors that will give your house some major curb appeal. 1. Red: You can't go wrong with a classic fire engine shade, and this bold hue looks great with homes clad in white, blue and grey. Try it in a high-gloss finish, like this one below, to make it extra eye-catching. 2. Indigo: We especially love how this color will change shades and look totally different from morning to night. It's dramatic and dark, but also crisp paired with bright white trim. 3. Orange: Go bold or go home. Nothing makes a statement quite like orange, and this not-to-be-missed hue will draw people right inside. We especially love it on a dark charcoal backdrop, which makes the color really vibrate. 4. Black: While you may argue that this is the opposite of a stand-out color, a freshly-painted black door commands attention and looks great with just about every exterior and style.

5. Lime Green: We have to look twice when we pass homes with an entrance painted in this show-stopper.
wedding decoration ideas in churchWhile we know it won't work for every abode, it looks especially smashing with brown, grey or a raisin-colored exterior.
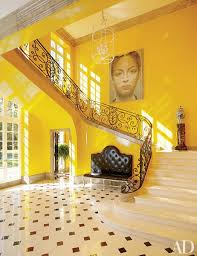
contemporary home decor pictures 6. Yellow: For an unexpected pop that can rejuvenate the most tired-looking facade, go for a bright marigold.
wedding decoration ideas in churchIf you ask us, there's no other color that will make you happier after getting home from a long day. Click through our slideshow of pretty front doors. And, if you're still on the fence about which color to go for, take a walk around your neighborhood for some local inspiration.

Have something to say? Check out HuffPost Home on Twitter, Facebook, Pinterest, Tumblr and Instagram. Do you have a home story idea or tip? (PR pitches sent to this address will be ignored.) Best Colors For Front Door Paint Colors Painting Ideas Paint Color Tips Painting Tips The Best Way to Finish an Exterior Wooden DoorConsider the entrance hall your opportunity to sweep guests off their feet. Whether visitors are welcomed into a soaring space crowned with a sparkling chandelier, or a cozy foyer with warm wood floors and a bouquet of blooms, the entryway sets the tone for the rest of your home. This transitory spot is the perfect place to showcase a sleek console table and statement mirror, a bold painting or sculpture, or an ornately tiled floor with a vibrant color palette. Utilize this prominent entrance space to add elegant decor details that will help to elevate the overall ambience of your home. Take a cue from these stunning entrances from the Architectural Digest archives and ensure that the foyer of your home is as spectacular as the rooms that follow.
After AfterStripping: I almost always strip my furniture before I paint it. Another option would be to sand it really well. You don’t want any clear finish or wax on it or the paint will scrape right off. I use Jasco paint stripper. It comes in a can and I think you should be able to find it at most hardware stores. Follow the directions on the can and make sure you have long sleeves and pants, shoes, and safety glasses or goggles on. Trust me on this one…I was using this wearing flip-flops and got just a speck of it on the top of my foot….Ouch, it feels likes it's burning a hole through your skin…actually it probably is. You can use a wire brush to get into crevices. I buy the small disposable wire brushes at the hardware store (they are shaped like a toothbrush).Prepping: Before you paint, wipe the piece down to remove all the stripper and sand it lightly. I like to use the 3M sponge sanders. Wipe down again after sanding.Adding appliqués: If you would like to add appliqués now is the time.
You can see on the picture of my bed that I added a cherub/swag appliqué. There are a number of places you can buy them. One is Do It Youself Chic and another is The Shabby Suite. Update: I've been purchasing some lately at The Bella Cottage. Click on either one of those to go to their website.Primer: Some pieces I primed first and others I didn’t. If the wood still has stain that was not removed completely from stripping and sanding it, I would prime it for sure. Make sure you get a primer that also says "sealer", this will seal the stain so it doesn't bleed through your paint. Some pieces of furniture will need two coats of primer to seal the stain.Paint: I use regular latex indoor house paint. I’ve used flat and eggshell, it doesn’t really matter, in the end they look the same. I use a soft white, not pure stark white but any color will do. Just brush it on following the grain of the wood. Let it dry and if needed add a second coat. I wait about a week before I go on to the next step (If you're in a hurry you can probably wait 48 hours and be fine).

Latex paint it will be gummy if you try to sand it before it’s really had time to cure. It’s going to look really bad at this point, it will be very flat and chalky looking, especially if you used flat latex but trust me it will look good in the end after you put the paste wax on.Sanding and distressing: I lightly sand the whole painted piece with very fine sand paper. This really smoothes out the latex paint. On the edges I sand through to the wood to give it a distressed look. You want to do this in areas where the piece would normally wear over time, like on the edges. If you want a more distressed look you can take a large chain and hit it on the wood to leave dents…I don’t do this but I’ve seen my dad do it on his pieces.Adding accent colors: This is optional but on some pieces you may want to add another color to bring out the details of the piece. There are two ways to do this. The first is to buy some brown craft paint (umber or sienna colors) and dilute with a little water to make a wash.

Use a rag to wipe the wash over the area you would like to “antique” and then lightly wipe away the excess. If you’ve added too much you can remove some of it with a wet rag. I used this technique on the cherub swag appliqué on my bed. The second option is to use “Rub n Buff” which is available at most hobby stores. It comes in many different colors. Put a little on your finger and lightly rub over the piece where you want to add color. The difference between these two options is that the first one gets down into the crevices and the second one goes on the high spots. You can even use both of these together.Waxing: I use a paste wax instead of a clear coat. I use Howard Citrus Shield Premium Natural Paste Wax. Make sure you get Natural color because it comes in different wood tones also. The wax does make the furniture a little more yellow but it's very light. Follow the directions on the can…you rub it on and buff it out. It takes a few coats of this to give it a nice luster.