best paint for painting outside of house

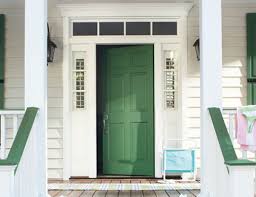
20+ Dreamy Paint Colors for Your Kitchen Skip the do-overs and pick the perfect paint color the first time around. Here, expert designers shared dozens of their favorite hues for every space, shade and season. It's our best paint color advice, all in one place. Colors for Your Front DoorColors for Your Front DoorWhat's the quickest, easiest makeover you can do? Paint your front door in one of these welcoming colors. Colors for Your FoyerColors for Your FoyerEntryways are all about first impressions. Get off on the right foot with a statement-making hue, like Benjamin Moore's Razzle Dazzle. 25 Best Blue Paints According to Top DesignersChoose the Best Colors Designer insights you can use to select the right paint colors. More on Choosing Interior Paint Colors Select the Right Sheen Which sheen is best for your walls? Let us help you find the right one. More About Paint Sheens Know How Much Paint To Buy Calculate the amount of paint you need & save some time and money.

How to Paint a Room Watch our step-by-step guide on interior painting and get better results. Choosing Paint Brushes and Applicators Concrete & Garage Floor Paint Trending Chalk Paint Projects When you’re ready to tackle your next paint project, we offer an amazing choice of colors from top paint brands, at the best price, and expert know-how to help you do the job right. Whether you’re making a colorful update to the interior or exterior of your home or working on a unique DIY project, you can really pour on the creativity with our unmatched selection of paints and exterior stains, craft supplies like chalkboard paint, stencils, glitter, or even glow in the dark spray paint. You should also check out our paint project and buying guides as well as The Home Depot Blog for current paint trends, popular color palettes and paint craft ideas. For all your painting needs, small and large, we’ve got you covered at The Home Depot. Your color has been saved to your My BEHR account.

Access your account anytime from the "My BEHR" button at the top of every page. There was a problem saving your color. We're adding this sample to your shopping cart. Enter your email address and we'll send you a password reset link. Password Reset Link Sent Please check your email for a link to reset your password. The following color(s) are not available as a sample for purchase. They were not added to your shopping cart. Your colors have been added to your cart. Color Used in This How-To Paint & Stain Calculators Ask An Expert: How To Advice Begin your painting project by pouring thoroughly mixed paint into a bucket and dipping a quality 2"-2½" wide nylon/polyester brush into the paint. Using your brush, cut in along the edge where the roofline and the fascia meet and/or where the wall and the fascia meet. Starting at an upper corner, use your roller to paint the fascia board. Continue working into the cut-in area with your roller until the fascia board is complete.
Begin at a corner of the recess and continue around its perimeter.
cheap home decor crossesWork from top to bottom. Continue painting the remainder of the panel until the entire panel is complete. Repeat the process of painting the panels and their recesses until all the panels are complete. Wipe away the excess paint that has overlapped onto the stiles. When the panels are complete, paint the stiles of the door in the following order: middle, top, center, bottom, left, right. Starting at the top of the door frame, begin painting the inside of the frame. Continue until the frame is complete. Wipe away the excess paint that has overlapped onto the trim. Starting at a top corner of the door trim, begin painting along the side edge of the trim where it meets the wall. Continue until all side edges of the trim are complete. Return to the top of the door trim and begin painting the face of the trim.

Continue until the door trim is complete. Other Things To Know How to Remove Exterior Mildew Stains How to Repair a Crack on a Wood Surface How to Repair a Hole on a Wood Surface How to Repair Flaking Paint How to Repair a Gap How to Use a Paint Brush and/or Roller How to Paint the House Body How to Paint Exterior Window Frames How to Paint Shutters How to Paint a Garage DoorA great exterior painting job can vastly improve a home’s curb appeal, while a home with a subpar exterior can quickly become a neighborhood eyesore. Educating yourself about exterior paint application and maintenance is the best way to avoid having to repaint your home too often. A poorly done paint job can force you to repaint in just a couple of years, but knowing how to properly prep your home for painting and care for it afterward can extend the life of the paint job significantly—possibly by up to a decade. Preparation is the key aspect to achieving a long-lasting exterior paint job.

Painting over dirty, moldy, chalky, or flaky surfaces will weaken the paint’s ability to adhere to the surface. If the paint cannot properly adhere, you will be left with an uneven paint job that is prone to chipping and flaking. Whether you are tackling the painting process on your own or hiring a professional, make sure the proper preparation steps are taken to ensure that your paint has the best chance of adhering successfully and remaining in good condition for a long period of time. Check out our blog posting for an in-depth look at exactly what goes into good exterior painting prep work. For most exterior painting jobs, acrylic latex paint is often the best choice. Acrylic latex paints are versatile because they can be used over either water- or oil-based primers. They don’t harden over time, which can help prevent blistering, and they don’t mildew as easily as oil-based paints. Additionally, acrylic latexes emit fewer VOCs, making them the more environmentally friendly way to go.

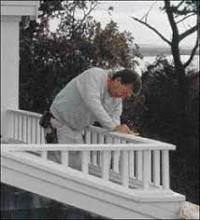
Oil-based paints are still preferable for certain types of projects due to their ability to repel water and resist wear. Steel and iron railings as well as areas that get walked on frequently, such as steps, stoops, and porches, can benefit from oil paint’s strengths. Once your home is effectively prepped and your paint of choice is applied, it should be looking pretty good, but your home’s makeover will only be truly successful if it lasts. In order to keep your home’s new beauty from fading too soon, there are several steps you can take to prolong the paint job. Unless your home’s old paint job is still in reasonably good condition, it is very important to use a primer beneath the color top coats—especially on new, previously unpainted areas. Primer acts as a base coat, helps smooth out any surface imperfections, and improves paint adhesion, thus making the paint less prone to chipping, bubbling, or flaking. If you are using acrylic latex paints, you can apply either a water- or oil-based primer, but be sure to only use an oil-based primer if you are going with oil-based paint for the top coat.
In addition to making your home look better, paint also acts as a barrier that protects your house from the elements. However, to be a successful protectant, paint must be applied correctly. Verify that all bottoms and sides of surfaces have been painted completely, because any unpainted, exposed area will be vulnerable to damage, including weathering, rotting, or mildewing. It is also helpful to use a three-coat system over any particularly damage-prone areas; after applying primer, apply two coats of finish paint instead of just one to add an extra layer of protection. Painting parts of the house that are in direct sunlight will cause the paint to dry too quickly, which can lead to visible seams, brush strokes, and unevenness. It is advised to paint an area that is on the other side of the house from where sunlight is directed. The same drying issues can also arise if it is extremely hot out, so it is best to paint on days when the temperature is milder. Paint cannot properly adhere to damp surfaces, so wait a few days to paint following any prep washing or heavy rain.

If it just drizzles, it is typically safe to resume painting after 24 hours of drying. Check the forecast before painting to ensure no rain is due in the area while painting will be done or in the hours immediately following application. It’s advantageous to hose down patios and underneath any overhangs at least once a year to help prevent dirt buildup that rainwater cannot rinse away. Additionally, you should plan to pressure wash your exterior approximately five years after your paint job. This will wash away any accumulated dirt or mildew that can make your paint look faded or discolored. Keeping up with cleaning maintenance will also help cut down on the preparation needed for your next paint job. The average home requires repainting every seven to ten years. This can vary based on weather patterns and building materials. For example, stucco homes in temperate climates will have longer-lasting paint jobs while wood homes in areas that experience extreme temperatures will require more frequent painting.