best exterior paint for door

Protect your home and increase curb appeal with the best exterior house paint A new coat of exterior paint improves your home’s appearance while simultaneously protecting it from moisture, fading and temperature changes. This guide will help you understand the different varieties of exterior paint and determine which type is best for your home. Water-Based vs. Oil-Based Paint Water-based paint is typically used for most exterior applications, but oil-based paint may work better on metals and bleeding woods. Consists of pigment and binder with water used as carrier Flexible: Expands and contracts with siding on house Breathable: Won’t trap moisture and crack or peel Dries faster (1-6 hours) with less odor Latex paints with an all-acrylic binder hold up to weather better than those with a vinyl-acrylic binder. Consists of pigment and resin in a solvent thinner. When thinners evaporate, the resins form a hard coating, leaving behind the pigment, which provides the color

Longer dry time (8-24 hours) Better adhesion and stain blocking: Ideal for chalky or stained surfaces, bleeding woods (tannin or sap) and metals that rust Tip: Water-based paint can be applied over oil-based paint, but oil-based paint shouldn’t be applied over water-based paint. On surfaces with four or more coats of oil paint, stick with oil, since a water-based paint may cause the oil paint to pull away and crack. Bare wood and a few other bare surfaces need to be primed before you paint them. Like paint, primers come in oil- and water-based varieties. Oil-based primers are suitable for use with oil- or water-based paint, so you can prime a chalky surface with oil-based primer for better adhesion and still take advantage of the benefits of latex paint. Like oil-based paint, these primers are preferable for stained wood, bleeding wood (sap or tannin) and metals that rust. Water-based primers are recommended for most applications, but should only be used with water-based paint.
Look for specific primers to be used wood, concrete, and metals such as galvanized steel, iron and aluminum. Choose between flat/matte, glossy and satin finishes. Flat/matte finish: A flat finish hides imperfections better than a glossier finish but doesn’t clean as well. Flat finishes are generally used for siding. Glossy finish: Glossy paint creates a hard, shiny, durable finish that is easy to clean. Glossy paint brings out details, so it is usually preferred for trim and doors. It also accentuates imperfections, so it is not well-suited for siding or walls. Satin finish: A satin finish has a slight gloss, so it is easier to clean than flat paint yet still hides imperfections well. Exterior paint must withstand harsh weather, sunlight, temperatures and more. For this reason, some formulas are designed for use on specific parts of your home. Oil and latex available; Oil and latex are both available; Oil and latex formulations available Will withstand wear and exposure to severe weather conditions

Surface Preparation and Painting Even the best paint won’t adhere well or produce good results if you don’t prepare the surface correctly.
home decorating ideas corner If the surface has been painted before, check for peeling paint and scrape it off prior to applying a new coat. Clean, scrape and fill holes in the surface prior to paint application. If unpainted wood is gray or weathered, it should be sanded. Sleek surfaces may require light sanding to improve adhesion with primer or paint. Prime all bare wood, including bare spots and nails on previously painted surfaces. Tip: Paint in the right weather: In temperatures colder than 50 degrees, most paint won’t dry, but cold-weather paints are available for cooler climates. In warm temperatures or direct sunlight, paint may dry too fast, causing lap marks. Wind, rain and humidity can also affect the drying time and final appearance.

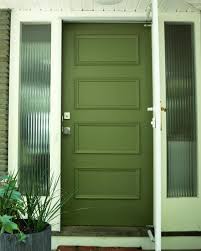
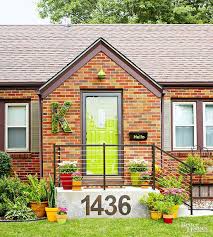
Check your paint label for recommendations on temperature ranges before starting. Exterior Paint, Stain & Waterproofing Masonry, Brick & Stucco Paint Ask A Home Depot ExpertExterior acrylic paint protects your exterior door from the elements. Interior enamel paint is tough and durable, but don't make the mistake of painting your exterior door with it. The best paint for exterior doors is exterior acrylic paint because it is flexible and contains mildewcides designed to protect your door from harsh conditions. No paint will stick to dirt, grease or rust, so you will have to clean the door before you paint. Use a synthetic mini roller to give your door a fast and easy face-lift. Plan to paint on a day with no rain in the forecast and the expected temperature will be 50 to 90 degrees Fahrenheit. Paint during the time of day when the sun is not shining directly on the door, as the heat can cause paint blistering. Remove the doorknob, lockset and the kick plate with a screwdriver.
Cover the floor under the door with a drop cloth. Use the edge of a putty knife to remove old tape or decals from the door. Apply a mildewcide cleaner to any mildew. You can also use a bleach solution of one part bleach to three parts water. Clean the door with soapy water. Use a degreaser to remove sticky residue left by tape. Allow the door to dry completely before painting. Mask the hinges, the peephole, the door knocker and the weatherstrip on the bottom with painter's tape. Mask the perimeter of glass panes with a straight line of tape to ensure a uniform paint line. Tape everything that you don't want painted. Remove peeling paint with a putty knife, but don't force the paint off. Use a wire brush to remove rust from metal doors. Sand heavily weathered doors with a medium-grit sanding pad to smooth rough areas or flaking paint. Remove sanding dust with a clean, damp cloth. Omit this step if the door is in good shape. Fill holes or dents in the door with wood putty or a filler for metal, using a putty knife.

Allow the filler to dry completely. Sand the entire door with a fine-grit sanding pad to ensure a smooth substrate for paint. Wipe away the sanding dust with a clean, damp cloth. Remove dust from corners of paneled doors using a small paintbrush. Apply a bead of painter's caulk to cracks and seams around panels or windowpanes using a caulking gun. Remove excess caulk with a clean, damp cloth. Allow the caulk to dry completely. Fill a paint pan with stain-blocking primer. Slide a 4- or 6-inch synthetic mini roller cover onto a mini roller handle. Apply a thin coat of primer, ensuring that you roll the edge of the door. Use the tip of the roller to cut in around hinges and hardware and to access the corners of recessed panels. You can use an angled paintbrush for cut-in, but it will leave brush marks in the paint. Roll out drips or thick areas. Allow the primer to dry for the time recommended by the manufacturer. Sand the door lightly with a fine-grit sanding pad to smooth rough fibers brought out by the primer.

Wipe off sanding dust with a clean, damp cloth. Apply a second coat of primer to the door and allow it to dry completely. Clean the paint pan with soapy water. Stir the paint thoroughly to evenly distribute the color pigments. Pour it into a paint pan and place a clean roller cover onto the roller handle. Dip the roller into the paint and roll it back and forth over the grid lines to load the cover evenly. Use the tip of the roller, or an angled paintbrush, to cut in around hinges and hardware and to access the perimeters of recessed panel doors. Smooth out thick lines with the roller. Roll the paint onto the door using long, smooth strokes. Complete the centers of recessed panels first, moving to the larger area of the door last. Continue in this manner to paint the door completely. Allow the paint to dry for the recommended time. Leave the door ajar to prevent the edges from sticking. Apply a second coat of paint to the door and allow it to dry for 24 hours before replacing the hardware.