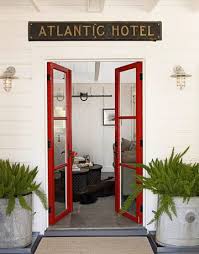
best black paint for exterior door

for ways to bring good luck to your home. Shop by Colour Family Dulux Once Gloss Pure Brilliant White 2.5L Dulux Trade High Gloss Paint White 2.5L Dulux Trade High Gloss Paint Pure Brilliant White 2.5L Wickes Smooth Masonry Paint White 5L Dulux Trade Undercoat Paint Brilliant White 2.5L Wickes Smooth Masonry Paint White 10L Dulux Trade Weathershield Exterior Flexible Undercoat Paint Brilliant White 2.5L Dulux Trade Weathershield Gloss Pure Brilliant White 2.5L Wickes Smooth Masonry Paint Black 5L Dulux Trade Quick Dry Wood Primer & Undercoat 2.5L Dulux Trade Weathershield Smooth Brilliant White 7.5L Dulux Trade High Gloss Paint Pure Brilliant White 1L Dulux Trade Quick Dry Wood Primer & Undercoat 1L Dulux Trade Undercoat Paint White 2.5L Dulux Trade Weathershield Gloss Pure Brilliant White 1L never miss a dealSign up for weekly offers Thank you for signing up for emailsDIY Spray Paint Door Knob Makeover
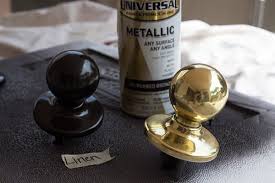
Sunday, March 9th, 2014 - Category: How To, On The Side, Sunday Funday DIY Spray Paint Door Knob Makeover is the quickest and easiest way to revamp your old ugly door knobs for cheap! Today’s Sunday Funday post isn’t a food recipe, it’s a recipe for a DIY home makeover that makes a surprisingly noticeable difference in your home. A few weeks ago I was surfing Pinterest and came across a before-and-after picture someone had taken to show how spray paint can makeover your door knobs. I was amazed, but also skeptical. How many “Pinterest fails” have emerged across the internet that show how far-fetched some of these DIY projects can be?! But this particular project is pretty easy to test and if it completely fails one screwed up doorknob isn’t a big deal. So on a random trip to the hardware store I felt inspired and decided to pick up a can of Rust-Oleum Oil-Rubbed Bronze Metallic Spray Paint to test out this DIY project on a linen closet door knob that doesn’t really matter much.
All we did was remove the door knob with a screwdriver, wipe it down with a Clorox wipe, and take it outside to spray paint. I was astounded by how great it looks. That spray paint is pretty miraculous, I seriously don’t know how they get those little opalescent glittery specks in there and make it look so multidimensional. We immediately got to work on the rest of the door knobs in our house, even our big front door one, and set up a little station outside on a drop cloth covered patio table.
easy and cheap christmas table decorationsWe used empty toilet paper rolls and Styrofoam to prop up the door knobs so it would be easier to spray and dry.
best time to paint exteriorI also labeled each knob with scotch tape and wrapped it around the spindle so we wouldn’t confuse the knobs since some of them had small differences.
beach house decor pinterest
We also sprayed the screws and covered any keyholes with small circular pieces of tape to maintain the lock’s functioning. It ended up taking two coats, after the first coat dried we saw some areas around the bottom of the knobs that we had missed. All in all it was a super simple afternoon project that cost about $10, less than the cost of ONE door knob! It immediately upgraded the more 1990s elements of our house into the 21st century.Obviously it doesn’t look quite as glittery inside the house and out of the sunlight. The color and sheen are perfect inside. Many of our door knobs were beat up, scratched, and some even had chunks of gold finish rubbed off. The spray paint does an excellent job of masking all of that. Have you done any DIY projects lately? Steal my baking secrets! Receive my 10 Baking Secrets You NEED to Know - for free!We're wanting to add some curb appeal to the front of our house. We have white vinyl shutters next to our windows and are wanting to paint them black.

I've seen a few sites say not to paint light to dark. Any opinions or suggestions? Not what you were looking for ? Good to hear you're thinking curb appeal! A new, fresh coat of paint can make a world of difference on your house and make it look like new! As far as not wanting to go from a lighter color to a darker, what you read wasn't just a biased opinion on decor, it's actually a bit more scientific. Painting vinyl shutters a shade that is darker than it's original color will cause it to absorb more heat than it's meant to, and this will lead to the vinyl rapidly expanding and contracting, and eventually buckling. Most vinyl shutters that you will see on homes are lighter colors, rarely will you see black. Light colors such as white reflect light much better than darker colors like black which absorb light, this is called the objects albedo (if you wish to really get scientific). By adding that darker shade onto the shutter, you're causing all the light to then be absorbed, when it was made to reflect.
You can find vinyl shutters in darker shades of green, but that is because the manufacturer has modified it to withstand the heat. As far as painting it though, I would recommend sticking to colors within the same family, such as slight off whites or perhaps even neutral yellows if you wish to be daring with your color. Hope that helps explain it a bit better for you =DThe builder put cranberry colored shutters on my home and I'd like to go to a more neutral charcoal gray. Since these are darker to begin with would it be okay to do this? Thanks for joining us on the community!~ I can't foresee any problems with going lighter, since it won't have as much heat build up as if you did it the other way around. With shutters, I find the preferred method is to take them down before painting. This allows you more control over the area and avoids the hassle of taping the exterior of the house. Just be sure to be careful when removing the hardware, as to not damage the shutter itself.
Just go slow with them. Clean them thoroughly to remove dirt build up, deposits and everything else they face on a daily basis. If you have tougher to clean areas, use a medium bristle brush and lightly scrub. Rinse them off any allow them to dry fully before moving on to painting. As for your paint, you want to make sure to select something that's very flexible, since vinyl has a very high expansion coefficient. Your average house paint just won't cut it for this job, you'll want to upgrade to BEHR Ultra. Semi-Gloss in particular is a very traditional finish for exterior pieces, and makes future clean up very easy. Oh, and as far as future cleaning goes with these...don't forget them = ) They need some love every so often too! I've never been a big proponent of power washing vinyl shutters, since I've always found it leaves a slight film behind. If at all possible, wash them by hand and make sure they dry neatly. Take care of them and they'll take care of you!~ I hope this helps you out and best of luck with the job!~ If you can, take some pictures of the finished product and let us see how it turned out!

I was thinking of the same tone/saturation of gray that is currently cranberry so that's one part down and now the other! The storm door and its frame are also the cranberry/burgundy (whichever it's called) and would like to have shutters/storm door match so I could paint the front door a rocking color! There is no portico-type protection so definitely exposed to the elements here in CT. What would I use and/or what is the process to do this? Glad I could help! As for your storm door, let's call the color burgunberry!~ When treating doors or storm doors, it's usually best if you can remove them from the hinges and paint them on a flat surface, kind of like how I recommended with the shutters. Depending on what material they're made of (vinyl, metal, wood) you may need to do a bit of prep work. If you have old paint on them, then you'll want to sand this down (or strip in the case of wooden if it has lots of layers to it) and make sure the surface area is clean first.
This follows my paint prep mantra: Clean, Dry, & Dull. For painting over metal, I've always found spray paint to work easiest. Make sure you pair it with a primer though, especially since it's going to be out with the elements. If yours is a wood door, then the Behr Exterior Ultra that I mentioned in the previous post would work great for that. It's exterior rated and comes with a built in primer to ensure the best adhesion. Also, make sure that you protect your glass and screen during painting. If either of these is easily removable, I would do so before priming. If not, make sure that you tape them off with plastic to protect them from the sanding and eventual paint. Be sure to keep us posted on how this comes out!~ = ) I am aware of the expansion problem with plastic based materials used for exterior building products. I certainly would follow the above advice as applies to PVC siding. However, I have never had distortion problems with painting plastic shutters dark colors.

There are many types of plastics in use for shutters and many, especially fiberglas, exhibit less heat expansion than does PVC. Also, shutters are relatively small items, unlike 12 foot sections of siding. A long run of siding will exhibit much more actual expansion in terms of length. If that length exceeds the expansion nailing slot, the siding will warp out! Shutters, being shorter, will not show nearly as much expansion. If its method of fastening allows for such expansion, no problem will result. I have hung hundreds of Sears shutters over the years with no problems. The Sears shutters were fastened with screws through the face. The hole drilled through the face of the shutter was much larger than the shaft of the screw. A decorative cap covered the screw head. The import was that the shutter had sufficient room to expand before binding up at the screws. Thanks for the response ordjen!~ In my experience, I've found it's usually more problematic in older shutters, which could be due to the fact that they weren't built using titanium oxide as we do now for UV protection.

I can't pinpoint that as a cause though, I'm certainly no chemist. Good to know about the PVC siding though, I'll keep that in mind. Appreciate you sharing your knowledge on here with us. Jay, I recently read an article in Fine Homebuilding Magazine which documented how badly vinyl siding can distort.The home next door to a house with vinyl siding had installed new reflective glass windows. this is the stuff that looks kind of like a golden mirror. The heat reflectedoff those new windows had caused the siding on the neighbors house to permanently warp. You could see the arc pattern of the sun distorted into the siding. PVC distorts at as little as 130 degrees. The nailing slots in vinyl siding are elongated. When nailing it, the nail must be placed in the center of the slot and not nailed down firmly. This is to allow the siding to expand along its length.I can believe that a dark painted siding would permanently distort in the hot summer sun. Similarly, I have long anecdotally noticed that the darkly painted wooden siding on on homes usually exhibits more moisture related peeling problems.